I'm Amy, a stay-at-home mom by day and a crafter by night. After a day of chasing my kids around the house, I escape to my craft room for a few hours of creating while they sleep. Thanks for joining me in my little corner of the crafting world!

Friday, September 28, 2012

Black Lace/White Tag Card

Today's card is for this week's Sketch Challenge and the Ways to Use It Challenge at Splitcoast Stampers.  The Sketch Challenge was a tough one for me, because I knew at least one of the layers needed to be a patterned paper.  Patterned paper and I have a love/hate relationship: I love to buy it but I hate figuring out how to use it!  As a personal challenge, I am trying to use more patterned paper in my cards.  I followed the sketch pretty closely.  If you want to see the sketch and play along with us, you can go HERE to get all the details!

For the Ways to Use It Challenge, we were to use a tag on a card.  If you want to see more about that challenge, just click HERE.

This card is a bit outside of my usual style, but I loved using these colors and this patterned paper.  I think the lace on this paper is so vivid!  This week was my grandmother's birthday (she passed away last year) and this card is very much her style.  So in honor of my Grammy, I made a card that reminds me of her:


On this card I incorporated some mulberry paper (the torn black paper behind the tag).  I love the texture mulberry paper provides.  Here's a hint, though: When you're tearing black mulberry paper at 2:00 in the morning, there's a darned good chance some of the little scrap pieces are going to look like hairy spiders on your craft table when you see them out of the corner of your sleepy eyes!  Don't ask me how I know this...

I adhered a strip of Black Floral Lace patterned paper (Recollections) to a piece of red cardstock.  I used the Dainty Lace Border Die-Namics die (My Favorite Things) on my Big Shot to die cut the white border.  I attached the border to the back of the long red piece and adhered both pieces to the black card base.  I embossed a piece of red card stock using the Square Lattice embossing folder from Stampin' Up! and attached that piece to the card base.  I tore a piece of black mulberry paper and adhered it to the patterned paper.   I stamped the sentiment in Memento Black using a Gina K stamp on a white tag, then attached the tag to the card with a small silver brad.  I also used a small amount of Tombow Mono Multi adhesive to secure the tag. 

You could easily change the sentiment on this card to fit any situation.  I chose "smile" so I could use this as an encouragement card, but the sentiment is general enough to be used for almost any occasion.

Thanks for stopping by!

Tuesday, September 25, 2012

You Warm My Heart with Polka Dots

This week's Clean and Simple (CAS) Challenge at Splitcoast Stampers was a sketch challenge (they provide a sketch and we use it for the card's design).  The Try a New Technique Challenge (also at Splitcoast Stampers) required us to use polka dots somewhere on our cards.  I combined both challenges in this card:

 
The stamps are from a Close to My Heart clear stamp set.  While I normally prefer rubber stamps, I absolutely love CTMH clear stamps.  They stamp quite well with a variety of inks and I think they make a very clean impression.  I bought this set because of the coffee images in it (the coffee cup in my previous post is from this set), but I thought these mittens and the tiny snowflake were adorable.  I hadn't even noticed the polka dot stamp in this set until tonight, and it worked perfectly for adding the dots required by the challenge!  I love stamp sets that have multiple uses.

The images are stamped on white card stock using classic dye inks from Stampin' Up! in Rose Red and Handsome Hunter.  (I don't think I will ever get those tiny snowflakes to stamp in a perfectly straight line!)  The white card stock is adhered to dark green card stock, and I used a thin piece of that same card stock to make the solid strip under the polka dots.  Because my larger piece of dark green card stock was not big enough for a card base, I trimmed it to fit as a card front and adhered it to a white card stock base.  The benefit of a white card stock base is that you won't need to put a liner inside your card for writing your message.

This card is quick and easy to make. Cards like this are perfect for making multiples at one time, and you can always vary the sentiment, colors or image if you didn't want duplicates. I like to keep extra cards on hand or add them to my box for Operation Write Home, so I try to make duplicates of "general" cards. (I don't tend to make duplicates of birthday cards for family and friends, as I try to make each birthday card specific to the person receiving it.)

One of the biggest difficulties I face in creating Clean and Simple cards is leaving all that white space!  The idea behind CAS is that you will have lots of open space and little (if any) layers or embellishments. I think CAS cards look deceptively simple sometimes.  If you make mistakes, they are easily seen on a CAS card. You can't just add an embellishment to cover them up!  I really love the clean look of a CAS card, especially with bold, vibrant colors.

That's all for today. Thanks for visiting!

Wednesday, September 19, 2012

Coffee and Pumpkins: Autumn is Coming!

For this week's Sketch Challenge at Splitcoast Stampers I created two cards: a coffee card and a pumpkin card.  I have quite a collection of coffee-related stamps (coffee is this insomniac's friend!) and I love working with brown hues, so this first card was really fun to make.


I started with a brown card base. I stamped the coffee cup (Close to My Heart) in Stampin' Up! (SU) Chocolate Chip dye ink on Ultrasmooth Vanilla card stock (SU). I cut the image out with a circle die on my Big Shot, then layered that circle on another piece of brown cardstock. I used an old SU tool, Layer Ease, to outline a layer around the stamped circle and cut that out by hand. (On a side note, I am seriously thinking I need to purchase some nesting dies. Trying to cut a perfect layer by hand in the middle of the night is no fun!). I attached two panels of coffee bean patterned paper to a layer of Ultrasmooth Vanilla card stock, then attached them to the card leaving a gap between them. However, the circle is so large that it looks like I just used one large panel. If I were to make this card again, I would just use one large panel across the page rather than taking the time to make two separate sections. I adhered the circle between the panels using dimensionals to help it "pop" off the page.

I stamped the sentiment (Art Impressions) on a piece of Ultrasmooth Vanilla card stock, layered it on a piece of brown card stock, tied some jute around the lower portion of the card and adhered the sentiment over the jute with dimensionals.

You will see more coffee-themed cards on this blog in the coming weeks, and since the weather is turning cooler, hot chocolate will probably make an appearance, too! I stock up on a lot of brown paper during this time of year!

Here is my pumpkin card (sorry for the picture quality...I was trying to capture the embossing):


This card was more challenging for me.  I rarely use orange in my crafting and rarely create Halloween-themed cards.  The image is a stamp I picked up at Michaels.  I stamped it in Memento Espresso Truffle dye ink on white card stock, then colored it with markers.  I cut the circle with my Big Shot and inked the edges with a brown marker.  I embossed a piece of brown card stock in my Big Shot using a Tim Holtz woodgrain embossing folder.  I cut that into two sections and adhered it to a piece of orange cardstock.  I attached a brown card front to a tan card base, then attached the orange panel to the card front.  I adhered the pumpkin image in the space between the embossed brown sections.  I stamped the sentiment (Unity) in Memento Espresso Truffle on white card stock, layered it on orange card stock and adhered it to the card front. 

I actually re-worked this card so many times that I had to put it away and work on it again this morning.  Sometimes putting a project aside and coming back to it later gives me a new perspective and fixes any "creative blocks" I'm experiencing.  I have a box of images and started cards that I keep on my craft table, and every now and then I will dig in the box and give one of those projects a second chance!

Do you ever just get "stuck" on a card?  How do you spark your creativity and breathe new life into an abandoned project?  I'd love to hear your comments!

Monday, September 17, 2012

CAS Leaves Cards

Last night I made a couple of "Clean and Simple" (CAS) cards for a Splitcoast Stampers challenge.  I find CAS cards difficult because the goal is lots of open space and few embellishments or layers, but I always think of one more thing I should add!  I am learning to reign in that desire and to see the beauty in the simplicity of the CAS style.  One benefit of less layers and embellishments is ease in mailing.  Sometimes "bulky" cards can be difficult (and more expensive) to mail, so CAS cards are terrific for mailing.

For this challenge, we were to use a picture of leaves (from Pinterest) as our inspiration.  Here's the first card I made:

  
I used a rectangle stamp from Stampin' Up! (SU) inked with Ancient Page dye ink in Saffron to make the background for the image on Ultrasmooth Vanilla cardstock (SU).  I inked one of the leaf stamps from the Fantastic Foliage set (SU) in Herb Garden dye ink (Big & Juicy Rainbow Pad by Ranger).  I love using rainbow/spectrum pads because they blend several shades into one pad, and if you move your stamp to a different place each time you ink it, you'll get a slightly different shade, which adds beautiful depth to the image.  I stamped the sentiment (Penny Black) in Memento Espresso Truffle dye ink.  I adhered this panel to a brown cardstock card base.  That's it!  Easy peasy.
 
I had so much fun making this card (and it took so little time) that I decided to make it again using different cardstock colors.  Here's my second card: 


I used the same ink and stamps as the first card, but used beige and kraft cardstock this time.  I also used the lighter hues on the stamp pad to get a softer effect for this card.  Notice I added an additional layer by placing a kraft later between the beige papers.  Otherwise this card is almost an exact replica of the first.  Once I get a design I like, I often make several variations of it.  It is always nice to have a few extra cards on hand (or in a box to donate to Operation Write Home, which I will talk about more in an upcoming post). 
 
That's all for today.  Thanks for visiting!


Friday, September 14, 2012

Scripture Inspiration

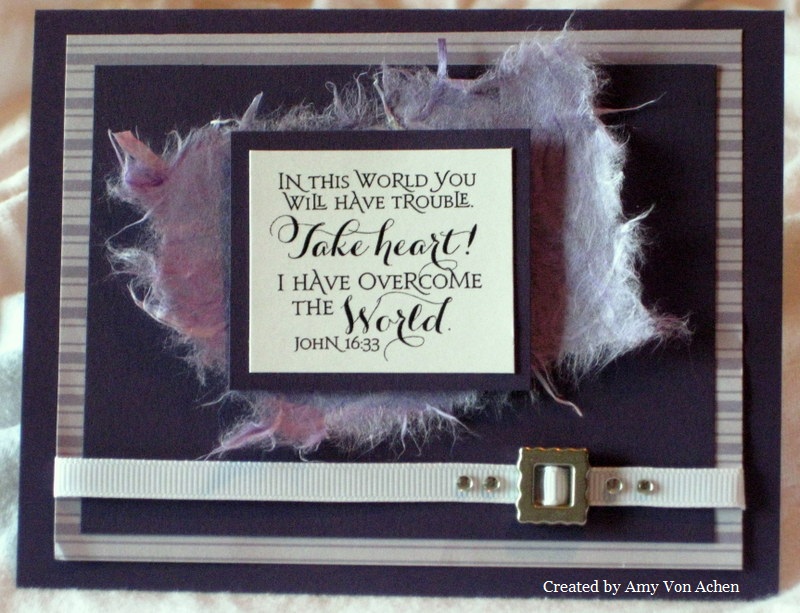
Today I want to share a couple of cards I made with stamps from the new Scripture Series 3 set from Our Daily Bread Designs.  This set is very special to me as I contributed one of the verses for it!  The verse stamped on this first card was my contribution, and as a special treat, I was able to make this card for the September release on their blog:
 

This verse has been one of my favorites since I was a teenager and always brings me comfort in the midst of difficulty.  I highlighted it with mulberry paper, which is one of my favorite papers to use. 
 
I love the combination of purple, silver and white in my cards. In fact, I liked it so much that I made another card using the same color combo and a different verse from the same collection:


I hope these verses inspire your day the way they have inspired mine!  Thanks for visiting! 


Thursday, September 13, 2012

Welcome!

Welcome to my brand-spankin'-new craft blog! Whether you're joining me in the wee hours of the night while I'm stamping or during the day while I'm chasing around my very busy kids, pull up a chair, grab of cup of coffee (or a shot of tequila...I won't judge!) and join me in my crafting adventures!

It's finally cooling off and providing some much-needed rain in my part of the world.  It was another late night for me as I tried to learn some new techniques. 

This is the card I created for this week's Ways to Use It challenge at Splitcoast Stampers.  If you're looking for a great online papercrafting community, you must check out Splitcoast Stampers!  It's a treasure trove of talented artists, inspirational gallery cards and very active user forums.  This week's challenge was to use markers in a new way.  They're not just for coloring, you know!  I chose to use two techniques on my card: Thumping and Misting.  These were both new techniques for me, and now that I've tried them I really want to work on perfecting them!  Here's my first card using these techniques:


I used a sunflower stamp from Mrs. O'Leary's.  I stamped on Ultrasmooth Vanilla cardstock (I don't think Stampin' Up! carries this anymore, but I believe it is similiar to Very Vanilla).  I inked the stamp first with Ancient Page ink in Saffron.  I then "thumped" it with several markers: Stampin' Up! Summer Sun, Pumpkin Pie and Garden Green markers, and Tombow Art marker #879 (brown).  The brown was a little dark so I smudged it with my finger to lighten it.  The green was a little too bright so I wiped some of the ink off with a cloth.  I huffed on the stamp to moisten the ink, then used my mini mister to mist water into the stamp (VERY lightly, holding the stamp about 8 inches away from the mister) and stamped the image.   I repeated this process several times to make a border.  I wrapped three pieces of brown fiber (Adornaments) around this piece and adhered it to a brown cardstock base.  I stamped "thank you" (Studio G/Hampton Arts) in Chocolate Chip Classic Ink (Stampin' Up!) on Ultrasmooth Vanilla, adhered that piece to another piece of brown cardstock and adhered it to the card using foam dimensionals.  Because this is a dark card base, I placed a liner of Ultrasmooth Vanilla on the inside of the card so I could write a message to the recipient. 

Now that I am a little more comfortable with the techniques I am looking forward to using them with other images.  I love the dimension the thumping technique provides, and the misting technique really softens the image.  I am sure you will see these techniques appearing on my blog again!

Thanks for stopping by!