Thanks again for all of your sweet comments, and thanks for stopping by!
Tuesday, March 12, 2013
Hello and Thank You!
Happy Tuesday! This is just a quick post to thank you for your comments over the past few days. I've been traveling with my family (we returned home last night) and am just now checking back in on my blog. It was so nice to see so many sweet comments waiting for me! Unfortunately, my son and I are both feeling under the weather right now, so it will probably be another day or two before I venture into my craft room and post another card. In the meantime, I'm looking forward to visiting your blogs and seeing your creations!
Friday, March 8, 2013
Raiding my Stash for Eyelets!
Thank goodness it's Friday! It sure has been a busy week at my house, and even though we also have a busy weekend ahead, I always look forward to having my husband around for "extra hands on deck" with the kids!! I think we all have a bit of Spring Fever at my house now that the snow has melted and it's starting to warm up, and "ornery" seems to describe my little ones quite well this week!
I have a quick card to share with you today. I never seem to have enough "get well" cards in my stash, so I have been trying to make a few of those to have on hand when I need them. This week I saw two challenges asking us to use eyelets. I don't use eyelets often anymore, but I sure have a nice stash of them! I decided to make a Clean and Simple (CAS) get well card using eyelets. I still set mine the old-fashioned way (no fancy setter for me), so this was a great excuse to raid my husband's toolbox and hammer away my frustrations!
Here's my card:

I used one of my favorite two-sided Authentique papers to create the background and flowers. I die cut the flowers and added red flower-shaped eyelets to the centers. I distressed the petals with Antique Linen Distress Ink, then rolled the edges of the flowers to add dimension. I stamped the sentiment directly on the background paper by first inking the stamp with Versamark and then inking with Memento Rich Cocoa. I attached the panel to a Natural White card base, then added three pearls to highlight the sentiment. I adhered the centers of the flowers to the background paper and added Glossy Accents over the eyelets to add some shine. Quick and easy!
I am linking this card to the following challenges:
I hope you have a wonderful weekend! Thanks for stopping by!
I have a quick card to share with you today. I never seem to have enough "get well" cards in my stash, so I have been trying to make a few of those to have on hand when I need them. This week I saw two challenges asking us to use eyelets. I don't use eyelets often anymore, but I sure have a nice stash of them! I decided to make a Clean and Simple (CAS) get well card using eyelets. I still set mine the old-fashioned way (no fancy setter for me), so this was a great excuse to raid my husband's toolbox and hammer away my frustrations!
Here's my card:

I used one of my favorite two-sided Authentique papers to create the background and flowers. I die cut the flowers and added red flower-shaped eyelets to the centers. I distressed the petals with Antique Linen Distress Ink, then rolled the edges of the flowers to add dimension. I stamped the sentiment directly on the background paper by first inking the stamp with Versamark and then inking with Memento Rich Cocoa. I attached the panel to a Natural White card base, then added three pearls to highlight the sentiment. I adhered the centers of the flowers to the background paper and added Glossy Accents over the eyelets to add some shine. Quick and easy!
I am linking this card to the following challenges:
- Free for All challenge F4A159 (use eyelets) at Splitcoast Stampers
- "Anything Goes" ABC19 challenge at 'ABC' Challenges
- "Addicted to CAS" at Addicted to Stamps and More
- "The Eyes Have It" CCEE1310 at CCEE Stampers
I hope you have a wonderful weekend! Thanks for stopping by!
Products Used:
Stamp: Verve
Paper: Lovely Collection: Crush (Authentique); Classic Crest Natural White card stock (Neenah)
Ink: Versamark and Memento Rich Cocoa (Tsukineko); Antique Linen Distress Ink (Ranger)
Tools and Accessories: Flower die (Provo Craft); red flower eyelets (unknown); pearls (KaiserCraft);
Glossy Accents (Ranger)
Wednesday, March 6, 2013
Teapot Tuesday's Scripture for Jean
Happy Wednesday! I want to start by sending out a big "Hello!" to all of you, and a big "Welcome!" to my new followers! It is always a joy to read your comments, and I love hopping around to see your blog posts, too. My kiddos have really kept me running at full speed this week and I've fallen behind. If I haven't made it by to visit your blog in the past couple of days, don't worry, I will be catching up in the next day or two!
Over at Splitcoast Stampers, our Teapot Tuesday recipient this week is a sweet lady who is battling cancer. In addition, she has macular degeneration which prevents her from doing the knitting and crafting she has enjoyed in the past. We were encouraged to use flowers or a cactus on our cards (if you squint really hard, you might be able to see the flowered outlines on the blue patterned paper), and we were told she would enjoy Scripture. I wanted to use cheerful colors, so I reached for a sunny yellow and sky blue combination. Only after I finished the card did I remember that the inspirational teapot was green and pink (yes, it's been THAT kind of week!). But I did see a tiny bit of yellow on the teapot, so I'm going to call it good!!
Here's my card:

This is one of my favorite Bible verses. I memorized it when I was a teenager and it provided great comfort during the "dramatic" teenage years! Now as an adult, it provides me with lasting comfort in the midst of life's difficulties. Last year, Our Daily Bread Designs asked stampers for suggestions of Bible verses to include in their upcoming Scripture stamp series. I suggested this one, and they chose to include it in their Scripture Series 3 set (and I received the set free!). I use this verse (and others in the set) quite often on my cards.
To create this card, I cut panels of two-sided patterned paper, wrapped baker's twine around the smaller panel and attached it to the larger panel. I attached the panel to a heavyweight white card stock base. I stamped the verse on white card stock in Versamark and Memento Tuxedo Black (I find this makes the text a bit darker) then die cut and embossed it. I die cut a scalloped circle from the patterned paper and attached the sentiment using dimensionals. I attached the scalloped circle over the baker's twine with dimensionals, then die cut two flourishes and attached them behind the scalloped circle. Finally, I added Stickles to the flourishes for dimension and texture. And just for good measure (and to cover an ink spot!) I fussy-cut a flower from the patterned paper and attached it to the back of the card, using Stickles on the flower center.
I wish I could see the looks on the faces of the Teapot Tuesday recipients when they open their mailboxes to find them full of cards from all over the world. What fun that would be! If you want to check out the current Teapot Tuesday challenge, just click on the link above and jump on in...you're always welcome!
I hope to get a couple more cards made and posted before the end of this crazy-busy week I'm having! Thanks for stopping by today, and I hope you'll visit me again soon!
Products Used:
Stamp: Scripture Series 3 (Our Daily Bread Designs)
Paper: Classic Crest Solar White 110 lb. card stock (Neenah); 110 lb. white card stock (Wassau Paper);
two-sided card stock (unknown)
two-sided card stock (unknown)
Ink: Versamark and Memento Tuxedo Black (Tsukineko)
Tools and Accessories: Nestabilities Standard Circles Large and Classic Scalloped Circles Large (Spellbinders); Scribbles Swirls Sizzlits (Sizzix); Crystal Stickles (Ranger); Daffodil Baker's Twine (Strands Etc.);
Stampin' Dimensionals (Stampin' Up!)
Stampin' Dimensionals (Stampin' Up!)
Friday, March 1, 2013
CASEd Squares for the Featured Stamper Challenge
Yippee, it's Friday! We are finally seeing some ground through the (slowly) melting snow here. It's a bit cloudy and dreary, but I'm just grateful I'm not snowed in anymore!
This week's Featured Stamper challenge at Splitcoast Stampers asks us to CASE (Copy and Share Everything) a card from the gallery of Andrea Hayes. Andrea has so many beautiful CAS (Clean and Simple) cards that it was hard to choose just one, and I have found several I hope to use for inspiration in the future.
(I have to apologize for the picture quality. The lack of natural light on these wintry, dreary days is really challenging my minimal photography skills!)
I started by adhering the patterned paper to a heavy white card stock base. I used my Big Shot to emboss a piece of Elegant Eggplant card stock, then cut it into a triangle and adhered it to the patterned paper. I stamped my sentiment using Elegant Eggplant ink on Whisper White card stock, then die cut it. I applied Lovely Lilac chalk to the circle and attached it to the card front using Stampin' Dimensionals. Finally, I added some Lavender Lace liquid pearls...and they looked really nice until I dropped the card while the pearls were still wet! I was able to repair the damage, but please don't look too closely at those pearls!! This card also qualifies for the Ways to Use It Challenge at Splitcoast Stampers this week, where we are celebrating the eighth anniversary of the challenge. How fun!
This week's Featured Stamper challenge at Splitcoast Stampers asks us to CASE (Copy and Share Everything) a card from the gallery of Andrea Hayes. Andrea has so many beautiful CAS (Clean and Simple) cards that it was hard to choose just one, and I have found several I hope to use for inspiration in the future.
I finally decided to CASE this beauty: Celebrate
Oh, how I love Elegant Eggplant! It is one of my favorite Stampin' Up! colors. I have used it here on both cards for my solid card stock and my ink. Instead of using two patterned papers, I used one patterned paper and one embossed card stock.
I had so much fun with her design that I decided to make two different cards. The first is a 5 x 5 square card, or maybe just a bit smaller, as I got a little overzealous with my paper trimmer!


(I have to apologize for the picture quality. The lack of natural light on these wintry, dreary days is really challenging my minimal photography skills!)
I started by adhering the patterned paper to a heavy white card stock base. I used my Big Shot to emboss a piece of Elegant Eggplant card stock, then cut it into a triangle and adhered it to the patterned paper. I stamped my sentiment using Elegant Eggplant ink on Whisper White card stock, then die cut it. I applied Lovely Lilac chalk to the circle and attached it to the card front using Stampin' Dimensionals. Finally, I added some Lavender Lace liquid pearls...and they looked really nice until I dropped the card while the pearls were still wet! I was able to repair the damage, but please don't look too closely at those pearls!! This card also qualifies for the Ways to Use It Challenge at Splitcoast Stampers this week, where we are celebrating the eighth anniversary of the challenge. How fun!
The second card is smaller at 4 x 4 inches:


For this one, I used the same patterned paper and embossed card stock, but I reversed them. I used Elegant Eggplant card stock for my base and ran the front through my Big Shot with an embossing folder, then attached a triangle of patterned paper. (Because the patterned paper on the top is so thin, I had to add a lightweight white card stock layer behind it so the embossed dots didn't show through.) I stamped the image on Whisper White card stock using Elegant Eggplant ink. I die cut the image, inked the edges with Lulu Lavender and attached it using Stampin' Dimensionals. Since I did not use a white card base, I added a white liner to the inside of the card.
I hope you have a wonderful weekend! Thanks so much for stopping by!
I hope you have a wonderful weekend! Thanks so much for stopping by!
Products Used:
Stamps: "Feel Better Soon"/Verve (first card); "Happiest Birthday Wishes"/Stampin' Up! (second card)
Ink: Elegant Eggplant Classic Dye Ink (Stampin' Up!); Memento Lulu Lavender (Tsukineko)
Paper: Purple Friendship (Crafts, Etc!); Elegant Eggplant, Whisper White card stock (Stampin' Up!);
Neenah Classic Crest Solar White 110 lb. card stock (base for first card)
Neenah Classic Crest Solar White 110 lb. card stock (base for first card)
Tools and Accessories: Nestabilities Standard Circles Large (Spellbinders); Swiss Dots embossing folder (Cuttlebug); Lavender Lace Liquid Pearls (Ranger); Stampin' Pastels, Stampin' Dimensionals (Stampin' Up!)
Thursday, February 28, 2013
How Many Circles Do You See?
Happy Thursday! Wow, the past week has just flown right by and I've had very little crafting time. We've had two major snowstorms which have resulted in many, many snow days at my house. I figured snow days would mean plenty of crafting time, but I've hardly had a moment to step foot in my craft room! My kids have had a blast playing in the snow and it's been fun to have the whole family home together, but I'm glad the snow is starting to melt and we're getting back to our routine again.
I created this card for three challenges. The Try a New Technique challenge at Splitcoast Stampers this week asks us to use circles on a card. The Teapot Tuesday challenge (also at Splitcoast Stampers) asked us to use circles while drawing inspiration from this week's tea set. And for the first time ever, I am entering the weekly challenge (Week 61) at Pixie's Crafty Workshop because I used snippets of scraps from my craft drawer for several pieces on this card. Those girls with their snippets are such a hoot, and I'm so glad I get to join them this week!
Here's my card:


This card uses one of my favorite techniques, the inlaid embossing technique. I saw a card using the technique with solid-colored circles on Pinterest, so I drew my inspiration for my background circles from that card, which can be seen HERE. I love it when I can CASE (Copy and Share Everything) a card or idea and change it a bit to create something of my own!
I started by die cutting several circles out of snippets of paper from one of my favorite matstacks. I adhered them to a piece of pale purple card stock, then ran the entire panel through my Big Shot and the Square Lattice embossing folder. I embossed a piece of shimmery pale purple paper with the Spots and Dots embossing folder, then adhered that over the circles. I attached the entire piece to an Elegant Eggplant card base. I stamped the verse in Elegant Eggplant on Natural White card stock, then die cut it and attached it to a die cut piece of Elegant Eggplant. I attached this panel using Stampin' Dimensionals. I added several sizes of pearls to the circles on the shimmery pale purple panel for a final "circles" touch.
I've lost count of how many circles are on this card! Too many? I hope not!
I have a couple of square cards that I'm finishing up today. I'm planning to post them tomorrow, so I hope you'll visit again soon. Thanks for stopping by!
Here's my card:

Another view, which hopefully shows the inlaid embossing better:

I started by die cutting several circles out of snippets of paper from one of my favorite matstacks. I adhered them to a piece of pale purple card stock, then ran the entire panel through my Big Shot and the Square Lattice embossing folder. I embossed a piece of shimmery pale purple paper with the Spots and Dots embossing folder, then adhered that over the circles. I attached the entire piece to an Elegant Eggplant card base. I stamped the verse in Elegant Eggplant on Natural White card stock, then die cut it and attached it to a die cut piece of Elegant Eggplant. I attached this panel using Stampin' Dimensionals. I added several sizes of pearls to the circles on the shimmery pale purple panel for a final "circles" touch.
I've lost count of how many circles are on this card! Too many? I hope not!
I have a couple of square cards that I'm finishing up today. I'm planning to post them tomorrow, so I hope you'll visit again soon. Thanks for stopping by!
Products Used:
Stamp: Scripture Series 3 (Our Daily Bread Designs)
Ink: Elegant Eggplant (Stampin' Up!)
Paper: Latte Matstack (DCWV); Elegant Eggplant card stock (Stampin' Up!); Classic Crest Natural White (Neenah); shimmery pale purple paper (from a scrap bag at cutcardstock.com);
pale purple card stock (unknown)
Tools and Accessories: Nestabilities Standard Circles Large (Spellbinders); Square Lattice embossing folder (Stampin' Up!); Nestabilities Labels One (Spellbinders); Spots and Dots embossing folder (Provo Craft);
pearls (KaiserCraft)
Wednesday, February 20, 2013
Comfort for Kay
It's finally snowing! We really need the moisture and it just hasn't felt much like winter this year, so the snow is pretty exciting! School has already been canceled for tomorrow and I'm hoping my husband will work from home so we can all hunker down for a good, old-fashioned Snow Day!
Last night I received a card drive request for a sweet lady named Kay. Kay turned 60 years old earlier this week and had been looking forward to retirement with her husband. Sadly, Kay was diagnosed with a very rare and very aggressive cancer a couple of months ago. Treatment has been unsuccessful and the cancer has now invaded almost every part of her body. It appears Kay's battle will be coming to an end soon, as the doctors believe she has a month or less to live. We've been asked to send cards to make her birthday week very special and to show her some love, comfort and encouragement in her final days.
This was a very, very hard card for me to make. What comfort can I offer someone who is nearing the end of life, especially someone I've never met? I turned to the greatest source of comfort I could offer: the promises of Scripture. I hope this verse will bring comfort to her in her final days.
Here's my card:

I wanted to keep this card Clean and Simple (CAS) and make the verse the focal point. I worked from the inside out this time, starting with the verse. I stamped it in black ink on white card stock, then die cut it with a scalloped rectangle die. I had a scrap of shimmery black card stock in my stash, so I die cut a larger scalloped rectangle and attached the verse to it. I used another scrap of shimmery black to die cut my flourishes. I found a lovely scrap of magenta-colored patterned paper in my stash, so I wrapped a piece of ribbon around it and layered it on the card front. I adhered my sentiment panel over the ribbon, then gently slid my flourishes into place and attached them to the card. Finally, I added a few tiny rhinestones to the flourishes for just a little bit of sparkle (this photo doesn't do the sparkly rhinestones justice).
This verse brings me comfort and hope every time I read it, and I pray that its message will help Kay, as well. If you are so inclined, please say a prayer or send comforting thoughts out to this sweet lady and her family.
Thanks for stopping by today, and extra-special thanks to those who take the time to leave a comment!
Products Used:
Stamp: Scripture Series 3 (Our Daily Bread Designs)
Ink: Memento Tuxedo Black (Tsukineko)
Paper: Jubilee Magenta Accent (K&Company); black shimmery card stock (from a scrap bag at cutcardstock.com); black card stock (unknown)
Tools and Accessories: Nestabilities Classic Scalloped Rectangles - Small and Large (Spellbinders); Scribbles Swirls Sizzlets (Sizzix); ribbon (Offray); tiny rhinestones (unknown)
Tuesday, February 19, 2013
Roses for Denise (Teapot Tuesday)
It's time for another Teapot Tuesday challenge over at Splitcoast Stampers. This week's recipient has been dealing with some serious medical issues lately and could use a little happy mail. She is an artist who paints a lot of trees and landscapes, and she loves tulips and roses. I had some gorgeous rose paper in my stash, so I knew right away that I would feature this paper on my project.
Here's my card:

I started with a black card stock base. I cut a panel of patterned paper slightly smaller than the card front (about 1/8" smaller on all sides) and attached it to the base. I stamped my sentiment on vellum and heat set it with clear embossing powder, then die cut it. Because it was difficult to see the sentiment against the patterned paper, I also die cut a piece of black card stock in the same size to layer behind it. I attached the vellum to the card stock with tiny black brads. I wrapped black fiber around the card base and added my sentiment over the fibers using dimensional foam tape. Not much stamping on this card, but I love how the paper really steals the show!
We still haven't had much snow or rain where I live (and we desperately need it), but I heard we may be getting a storm in the next couple of days. I'm hoping for snow, but at this point I'll take whatever moisture we can get!
I hope you are staying safe and warm, and I hope you'll visit me again. Thanks for stopping by!
Products Used:
Stamp: Sincere Salutations (Stampin' Up!)
Stamp: Sincere Salutations (Stampin' Up!)
Ink: Craft Black (Stampin' Up!)
Paper: Red Roses (Recollections); black card stock, vellum (unknown)
Tools and Accessories: Nestabilities Labels Eighteen (Spellbinders); black fiber (On the Surface); clear embossing powder (Mrs. O'Leary's); dimensional foam tape (Scotch); tiny black brads (unknown)
Thursday, February 14, 2013
Valentine's Day Card for My Husband
Happy Valentine's Day! I hope you're having a fun, relaxing day with the ones you love. This is just a quick post to show you the Valentine's Day card I made for my husband:

I wanted something masculine but still romantic, so I avoided hearts and lace and stuck with basic ribbon and brads. I "roughed up" the pretty paper with some distressing, so hopefully this is manly enough for my big bear of a husband (who's really more "teddy bear" than "growly bear", but don't tell him I shared that secret!). I waited to post this until after I gave it to him, thinking it would be a surprise. He opened it and said, "I figured this one was for me." That's when I realized it had been sitting in plain sight after I took pictures for the blog. Oops! But at least I know he pays attention to what I'm crafting!
I started with a natural white (almost ivory) card stock base. Then I used two-sided paper from Authentique: one side I stamped on for the card front, and the other side is the dotted panel, which I heavily distressed to darken the dots and mute the red a bit. For the larger piece, I used a script stamp and Walnut Stain Distress Ink. To get the softer effect, I stamped off first on a piece of scrap paper, then stamped on my card piece. I used a Nestabilities die to cut my scalloped piece. I stamped my sentiment in Rich Cocoa on another piece of natural white, then added more distressing with Tea Dye and Walnut Stain Distress Inks. I attached the sentiment piece to the scalloped piece and added the brads. I wrapped a piece of brown ribbon around the dotted piece, then adhered the scalloped piece over the ribbon using foam dimensionals.
Thanks for taking the time to visit me on Valentine's Day!
Products Used:
Stamps: Old Letter Writing (Hero Arts); Be My Valentine (Hambo Stamps)
Paper: Authentique Collection: Lovely (used "Greetings" and "Crush" 2-sided paper); Classic Natural White 80 lb. card stock (Neenah)
Ink: Tea Dye and Walnut Stain Distress Inks (Tim Holtz/Ranger); Memento Rich Cocoa (Tsukineko)
Tools and Accessories: Nestabilities Classic Scalloped Rectangles Small (Spellbinders); ribbon (Celebrate It Basic-Basic); brads (Recollections); dimensional tape (Scotch)
Wednesday, February 13, 2013
Valentine's Day Treats
Happy Wednesday! Valentine's Day is almost here, which makes me a little sad because I love Valentine's Day crafting. My son needed valentines for his classmates this week and I found a fantastic tutorial for adorable treat holders, so I just had to make some fun little packages for his class. A friend recently lamented that her child's school doesn't allow candy at their Valentine's Day class parties. Oh, the horrors! As a dedicated chocoholic, I cannot imagine this holiday without candy. Thank goodness my son's school isn't so strict!!
Here's what I made:
Here's a side view, so you can see how they stand:

(I have to apologize for the quality of the pictures. I finished them late at night and sent them to school with my son in the morning, so I had to photograph them without natural light. Nothing like last-minute crafting!)
These treat holders come together very quickly and Angie's tutorial is really easy to follow. The tutorial shows how to make a Halloween treat package, but as you can see it can easily be adapted to other holidays. Here's the tutorial and video I followed, which includes measurements and assembly instructions: Chic' n Scratch. (While you're there, check out some of Angie's other tutorials. She has over 400 of them!)
If you use an 8.5 x 11 piece of card stock for the base you can make three packages from one piece of card stock. I also had some 12 x 12 card stock that I wanted to use, so I was able to get more packages from a piece that size. I made 12 packages for my son's class and only needed one piece of 12 x 12 patterned paper (I only used the patterned paper on the front side of each package). I filled them with the snack size bags of candy, which cost me less than 20 cents each. I decorated mine by making a bow from baker's twine and attaching it with a mini glue dot to the tag, then attaching the tag to the package with dimensional foam tape (all things that I had in my stash of supplies). This is a very cost-effective project!
I chose to staple the candy to the package to keep it in place, but forgot to staple it before adhering the patterned paper. Quick fix: I adhered the tag over the staple. Easy peasy!
I hope you're enjoying your Valentine's Day crafting! Tomorrow I will post one final Valentine's Day card, so I hope you'll visit me again. Thanks for stopping by!
Here's what I made:
 |
| The kids are asked to give signed but unaddressed valentines. I substituted my name for my son's name just for these pictures. |
Here's a side view, so you can see how they stand:

These treat holders come together very quickly and Angie's tutorial is really easy to follow. The tutorial shows how to make a Halloween treat package, but as you can see it can easily be adapted to other holidays. Here's the tutorial and video I followed, which includes measurements and assembly instructions: Chic' n Scratch. (While you're there, check out some of Angie's other tutorials. She has over 400 of them!)
If you use an 8.5 x 11 piece of card stock for the base you can make three packages from one piece of card stock. I also had some 12 x 12 card stock that I wanted to use, so I was able to get more packages from a piece that size. I made 12 packages for my son's class and only needed one piece of 12 x 12 patterned paper (I only used the patterned paper on the front side of each package). I filled them with the snack size bags of candy, which cost me less than 20 cents each. I decorated mine by making a bow from baker's twine and attaching it with a mini glue dot to the tag, then attaching the tag to the package with dimensional foam tape (all things that I had in my stash of supplies). This is a very cost-effective project!
I chose to staple the candy to the package to keep it in place, but forgot to staple it before adhering the patterned paper. Quick fix: I adhered the tag over the staple. Easy peasy!
I hope you're enjoying your Valentine's Day crafting! Tomorrow I will post one final Valentine's Day card, so I hope you'll visit me again. Thanks for stopping by!
Products Used:
Stamp: deadbeat DESIGNS
Stamp: deadbeat DESIGNS
Paper: Red card stock (Bazzill); Classic Crest Solar White 110 lb. card stock (Neenah);
Candy Pile (EK Success, Ltd.)
Candy Pile (EK Success, Ltd.)
Ink: Real Red Classic Ink (Stampin' Up!); Pure Black Writer (Zig)
Tools and Accessories: Small and Large Tag Punches (Stampin' Up!); baker's twine (Strands Etc.);
mini glue dots; foam tape
mini glue dots; foam tape
Sunday, February 10, 2013
Clean and Simple Fairy Tale Wedding
Happy Sunday! I rarely post on the weekends, but I'm so excited about the code word this week at CASology that I'm hurrying to post my card before the challenge deadline.


I just love a good fairy tale! I bought a wonderful set of stamps several years ago that I used for my wedding, and I thought they would be perfect for this challenge. The CASology challenges call for Clean and Simple (CAS) cards, and I chose to make a *very* CAS card for this one:

Here's a better view of the scored lines:

I started by die cutting a scalloped square from white card stock. I stamped the church image in Craft Black ink, then sprinkled it with clear embossing powder and heat embossed it. I chalked over the piece with Mauve Mist chalk. I stamped the sentiment in Craft Black directly on the card base and heat embossed it with clear embossing powder. I scored lines on the card and adhered a piece of black shimmery card stock to the card front. I adhered the scalloped square over the shimmery black piece using Stampin' Dimensionals. I added Glossy Accents to the church image, then wiped most of it away with my finger, leaving a very light layer of satiny finish.
I'll be posting some Valentine's Day projects this week, so I hope you'll visit me again soon. Thanks for stopping by!
Products Used:
Stamps: Fairy-Tale Wedding (Stampin' Up!)
Ink: Craft Black Ink (Stampin' Up!)
Paper: Classic Crest Solar White 110 lb. card stock (Neenah); Shimmer Matstack (DCWV)
Tools and Accessories: Bigz Scallop Squares Duo (Stampin' Up!/Sizzix); clear embossing powder (Mrs. O'Leary's); Mauve Mist Stampin' Pastels (Stampin' Up!); Glossy Accents (Ranger);
Stampin' Dimensionals (Stampin' Up!)
Thursday, February 7, 2013
Monochromatic Thinking of You
Happy Thursday! It sure feels good to be getting this close to the weekend. We've been awfully busy at my house lately, and I could really use some down time!
This week's Clean and Simple (CAS) challenge at Splitcoast Stampers is a "limited supplies" challenge. We are challenged to use only monochromatic colors (and one neutral, if we wish). I chose to use shades of purple, and I added some tiny rhinestones in place of my neutral. Since it's a CAS challenge, we are supposed to have lots of open space and use few very layers and embellishments.
Here's my card:
 |
| (There's a tiny smudge on the "T", but it's not really noticeable in person.) |
I started by stamping my image in Lovely Lilac on Almost Amethyst card stock. I covered the image in clear embossing powder and heat set it. I stamped my sentiment in Elegant Eggplant and attached the stamped panel to an Elegant Eggplant card base. I added tiny rhinestones to the centers of the flowers for just a hint of bling. Quick and easy!
I love the simplicity and versatility of a monochromatic CAS card. Elegant Eggplant is one of my favorite Stampin' Up! colors, and sometimes it's nice to use something other than red and white at this time of year. I'm in the middle of making Valentine's Day treat packages for my son's class, so it was nice to add a little purple to my crafting time this week!
I hope you're having a fun, crafty week. Thanks for stopping by!
Products Used:
Image Stamp: Gina K. Designs
Sentiment Stamp: Sincere Salutations (Stampin' Up!)
Paper: Almost Amethyst, Elegant Eggplant (Stampin' Up!)
Paper: Almost Amethyst, Elegant Eggplant (Stampin' Up!)
Ink: Lovely Lilac Craft Ink, Elegant Eggplant Classic Ink (Stampin' Up!)
Accessories: Clear Embossing Powder (Mrs. O'Leary's); tiny rhinestones (Offray)
Tuesday, February 5, 2013
Mixed Media Valentine
Happy Tuesday! After a few days away from crafting while I nursed a migraine (oh, those evil weather changes) and rushed my way through a busy weekend, I finally had a chance to play in a brand-new challenge at Splitcoast Stampers, the Mix-Ability Challenge. This one is so much fun! It challenges us to use mixed media in projects, but even better, it teaches us how to use mixed media in projects. Lydia even created a fantastic video for the challenge, which you can see HERE.

Here's a close-up of the heart:

And hopefully you can see the shiny background a bit better here:

This week's challenge is "Yin Yang". We're asked to use something matte and something shiny on our cards. Since Lydia's video showed how to use gesso and I've been wanting to try gesso on a card, I used that medium to create a matte background for my heart. I have two "shiny" things on my card, one subtle and one not-so-subtle. I used heat embossing on my heart and I created a "raindrop" background using crinkled paper, Versamark and Glassy Glaze.
Here's my card:
Here's my card:

Here's a close-up of the heart:

And hopefully you can see the shiny background a bit better here:
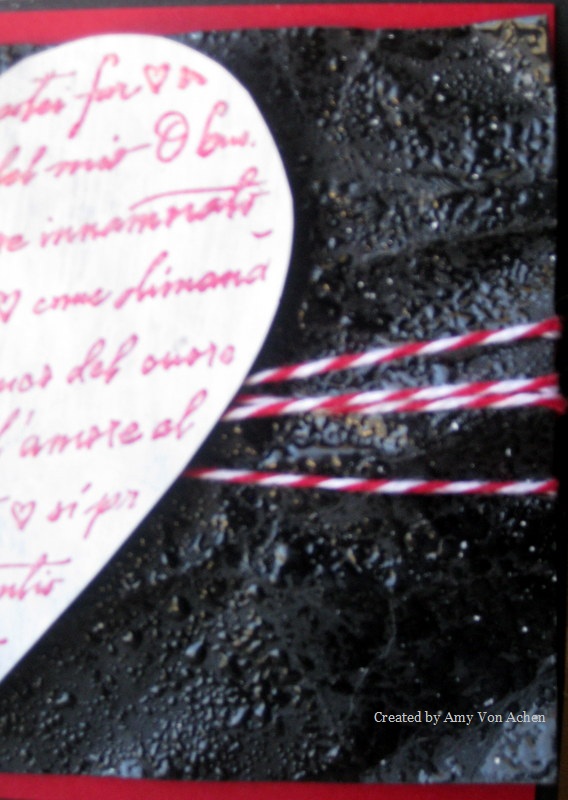
I started by applying gesso to a piece of patterned paper that was black with white hearts. (I was hoping a bit of the pattern would show through, but I was a bit too heavy-handed with the gesso.) I used a heat gun to dry the panel because I'm too impatient to watch paint dry! I stamped my image over the gesso with Rose Red craft ink and heat embossed it with clear embossing powder, then cut around the image to create the heart shape. Because the patterned paper is very light-weight, I cut a smaller-sized heart from chipboard (so it wouldn't be noticeable) and adhered it to the back of the stamped heart to give it some stability on the card.
Next I got to work on my shiny panel. I spritzed a piece of black card stock with water, then crumpled it. Once it was nicely crumpled, I flattened it out a bit and ran my heat gun over it to be sure all the water had dried. I rubbed Versamark all over it using the direct-to-paper method, then applied Glassy Glaze, which is like a chunky, shiny embossing powder. I heat set the Glassy Glaze to create a shiny, wet look that reminds me of raindrops.
I wrapped red and white baker's twine around the black piece. I adhered the black piece to a panel of red card stock, then adhered the red piece to a black card base that was cut to 4" x 5 1/2" (slightly smaller than an A2 card). I attached the heart to the shiny black panel using thick foam dimensionals and placed Zots on top of the dimensionals to really help the heart stick to the black panel.
I had so much fun playing with new tools for this card! I have really enjoyed making different styles of valentines over the past couple of weeks, especially since I can use my favorite color combo (black, white and red) so easily at this time of year! If you want to learn how to use new mediums and explore your creativity a bit, too, I hope you'll give the new Mix-Ability Challenge a try!
Thanks for stopping by today!
Products Used:
Stamp: Amore HeartPrint (Hero Arts)
Ink: Rose Red Craft Ink (Stampin' Up!). Versamark (Tsukineko)
Paper: B&W Doodle Hearts (The Paper Studio); red and black card stock (unknown)
Tools and Accessories: Gesso (O'Leary Paint); clear embossing powder (Mrs. O'Leary's); Glassy Glaze (Stampin' Up!); baker's twine (Strands, Etc.); 3D Foam Squares and Zots (Therm-O-Web); chipboard
Wednesday, January 30, 2013
Coffee for Gail (Featured Player Challenge)
Happy Wednesday! We woke up to light snow and crazy-cold temperatures this morning. It's hard to believe it was in the mid-70's here a couple of days ago! I hope you're all staying warm!
This week's Clean and Simple challenge at Splitcoast Stampers is a "Featured Player" challenge. Our challenge is to choose one of the Featured Stamper's CAS (Clean and Simple)cards to CASE (Copy and Share Everything). We have to keep the card clean and simple, which is actually quite challenging!
This week's CAS Featured Player is an amazing CAS designer. I really enjoy her creativity and style. I chose to CASE this one: Chillin' With a Cuppa
Here's my CASE of that card:

Yes, it's another coffee card. I just love coffee cards! I kept her design and the coffee theme, and also tried to pull in some of the blue she used on her card. Instead of using patterned paper for my main panel, I used an embossing folder to create texture and then used patterned paper for my scalloped circle and for the piecing on the coffee mug.
For this card, I started with the smallest parts. I stamped my coffee mug on white card stock and also on patterned paper. I cut the mug and handle from the patterned paper and pieced them onto the other mug. I added white Enamel Accents to the foam, scraped it around a little to create texture, then let it dry. I punched a heart from red card stock and adhered it to the mug. I fussy-cut the paper pieced mug and attached it to white die cut circle, then attached the white circle to a piece of patterned paper that I'd die cut into a scalloped circle. I embossed a piece of red card stock to create the background panel, then attached baker's twine to the red panel. I adhered the panel to a white card base, then attached my scalloped circle over the twine using dimensionals. Finally, I added some Stickles to the foam on the image to add a bit of sparkle.
Creating a CAS card like this is, for me, a very intense process because I have to be so darned careful!! I can't just keep adding layers or embellishments to cover up mistakes like I can with other cards. Another stamper mentioned recently that she keeps baby wipes in her craft room so she can wipe her hands constantly to keep from smudging ink onto her projects, and I need to remember to do that, too.
I hope you're having a great week, and I hope you'll visit again soon. Thanks for stopping by!
Products Used:
Stamp: My Cuppa Joe (Gina K. Designs)
Ink: Memento Tuxedo Black (Tsukineko); black marker (Tombow)
Paper: Arctic Wishes Matstock (DCWV); Classic Crest Solar White 110 lb. card stock (Neenah);
red card stock (unknown)
red card stock (unknown)
Tools and Accessories: Heart punch (Marvy Uchida); Big Shot (Sizzix); Square Lattice embossing folder (SU/Sizzix); Nestabilities Standard Circles Large (Spellbinders); Nestabilities Classic Scalloped Circles Large (Spellbinders); Enamel Accents (Ranger); Start Dust Stickles (Ranger);
Stampin' Dimensionals (Stampin' Up!); baker's twine
Stampin' Dimensionals (Stampin' Up!); baker's twine
Tuesday, January 29, 2013
Tipsy Hearts Valentine
Happy Tuesday! It's Teapot Tuesday time at Splitcoast Stampers, and this week's challenge asks us to make a card using a black-and-white combination on a Valentine in the form of spots, dots, patterns, etc. I love using black and white, but find myself always wanting to sneak in a pop of red!
Here's my card:

I think I'm on a Clean and Simple (CAS) kick this week! I really like the uncluttered look of this style. I started by die cutting my hearts from patterned paper. The patterned paper is pretty thin, so I also die cut some chipboard and adhered it to the paper. Using a black marker, I colored the edges so the "kraft" color of the chipboard wouldn't be seen on the card. I covered the patterned paper with Versamark using the direct-to-paper method, added clear embossing powder and heat embossed it to give the hearts a shiny finish. I die cut another heart from a piece of heavyweight white card stock, stamped my sentiment, then inked around the heart with the black marker.
I used my Big Shot to emboss a piece of red card stock with a Texturz plate, then wrapped my ribbon around the red panel. I attached the red panel to the card base and adhered my hearts using foam tape to add dimension. For extra support, I added a white liner to the inside panel and stamped it with two small hearts.
Here's a closer look at the hearts and textured background:

I'd like to share a couple of money-saving tips that helped with this card:
Sentiment: I needed a sentiment that would fit inside the small heart on this card but had difficulty finding one. The "for you" sentiment I found is actually part of a larger stamp that has an image beneath the words. To use just the words, I covered the rest of the stamp with a piece of paper and inked up just the words I wanted to use, then removed the paper "mask" and stamped my sentiment. This is a great way to get extra use out of stamps (and avoid having to buy extra sentiments).
Chipboad: You can buy chipboard at craft stores, but you can also find a lot of it around your home. Since I knew I'd be covering up the chipboard with paper, I used a cereal box for my chipboard. Once you start looking for it, you can find chipboard all over the place! Another "free" source of chipboard is the piece that's often inserted into your shopping bag (to keep your paper from bending) when you purchase patterned paper at craft stores and hobby stores.
I'm also entering two other challenges with this card: 'ABC' Challenges asks us to make Valentine's Day cards, and Addicted to CAS gave us the code word "heart". If you want to play along with these challenges, click on the links to join in the fun!
Thanks for stopping by!
Products Used:
Stamp: Fun Filled (Stampin' Up!)
Paper: Small Black Dots (Recollections); Classic Crest Solar White 110 lb. card stock (Neenah);
black card stock, red card stock (unknown)
Paper: Small Black Dots (Recollections); Classic Crest Solar White 110 lb. card stock (Neenah);
black card stock, red card stock (unknown)
Ink: Memento Tuxedo Black (Tsukineko); Versamark (Tsukineko)
Tools and Accessories: Big Shot (Sizzix); Hearts, Tipsy (Sizzix); Crush On You Texturz Texture Plate (Sizzix); clear embossing powder (Mrs. O'Leary's); ribbon (Celebrate It Basic-Basic 1 1/2 inch)
Monday, January 28, 2013
A Little CASE, A Little CAS
Happy Monday! We are having a bit of a "heat wave" where I live, and we're supposed to see temperatures in the mid-70's today. That is AMAZING for January in the Midwest! I was almost ready to break out the shorts and t-shirts until then I saw that we'll dip back into the 20's and 30's for lows over the next couple of days. It may not be time to pack my winter coat just yet! But today we have lots of sunshine and beautiful weather, so it's not a bad way to start the week at all!

I kept the card's design and CAS style. I changed the image and die cuts, and I used a stamped layer in place of her embossed layer.
This week's Featured Stamper at Splitcoast Stampers is a crafter whose blog I have been following for awhile now, so I was excited by the challenge to CASE (Copy and Share Everything) one of her darling cards. She makes the most amazing Clean and Simple (CAS) cards. With this challenge, we pick a project from her gallery to CASE by changing at least two elements to create a new card.

I kept the card's design and CAS style. I changed the image and die cuts, and I used a stamped layer in place of her embossed layer.
I started by stamping the coffee cup image twice on a piece of Natural White card stock using Rich Cocoa ink. I fussy cut the entire cup from one image and the center circle only from the second image. The image doesn't include a band on the card, so I created a band from kraft card stock and pieced it onto the cup. I adhered the center circle over the band using foam tape to give it some dimension. I die cut and embossed a layer from dark brown card stock and adhered the coffee cup to it.
I stamped the coffee beans on a piece of Natural White card stock, adhered it to a slightly wider piece of dark brown card stock and attached the panel to a Natural White card base. I adhered the coffee cup layers, once again using foam tape. I stamped the sentiment directly on the card base to complete the front of my card.
I'm working on several cards this week and plan to get them posted over the next few days, so I hope you'll visit again soon. Thanks for stopping by today!
Products Used:
Ink: Memento Rich Cocoa (Tsukineko)
Ink: Memento Rich Cocoa (Tsukineko)
Stamp (cup image): My Cuppa Joe (Gina K. Designs)
Stamp (coffee beans): Espress Yourself (Stampin' Up!)
Stamp (sentiment): Warm Cup of Coffee (Stampabilities)
Paper: Classic Crest Natural White 80 lb. (Neenah); brown and kraft card stock (unknown)
Tools and Accessories: Nestabilities Labels Eighteen (Spellbinders); Big Shot (Sizzix)
Thursday, January 24, 2013
Valentine for a Friend
Happy Thursday! It's another dark and dreary (and oh, sooooo cold) day here, but I'm so excited that the weekend is in sight!
I created today's card for a couple of different challenges. I used the sketch from this week's Card Sketch challenge at Splitcoast Stampers. I am also entering the color challenge at Dynamic Duos:

The "dessert" option on the color challenge is to make a Valentine, but since I am sending this card to a friend I didn't want to use the traditional hearts and lovey-dovey sentiments. I left the hearts and flowers behind and headed straight for the chocolate!
This card turned out very differently than I'd planned. I ended up adding more and more and more layers until the card was so heavy I had to add a heavyweight card stock liner to balance it! Have you ever heard the children's song, "This is the Song That Never Ends"? As I created this card, I kept thinking, "This is the card that never ends!" But I just kept adding layer after layer after layer. I'll be honest, the creative process got a bit out of control last night!
Here's my card:

(Isn't that candy image fun? I went to my mailbox one day, expecting only bills, and was surprised to find a package with this stamp and two other chocolate-themed stamps. A very sweet family member saw them and thought of me, so she bought them and sent them in the mail as a surprise. Isn't that the best kind of surprise? So very "sweet" in more ways than one!)
This is a square card, 5"x5", which I don't often make. They require square envelopes and additional postage, so I usually reserve this size for cards I'm hand-delivering. I started by stamping my candy images on Whisper White card stock using Real Red ink, then die cut them. I used a deckled square punch to cut four squares from Real Red card stock. I stamped the sentiment in black craft ink, added clear embossing powder and heat embossed it. Then I started cutting layers (and layers, and layers!) of Real Red, Whisper White and Basic Black card stock and adhered them to the base. I attached the images and sentiment (using dimensionals behind the sentiment), then covered the candy images with Glossy Accents to get the shiny look of the "real thing". I added my heavyweight (balancing) inner liner and stamped it with the same candy images in the corners. Then I searched my house high and low for some of that delicious chocolate candy, and doggone it, there was none to be found!
I love hearts and flowers and all the romantic stuff of Valentine's Day, but I have come to realize the value of my friendships with women. This year as I'm celebrating Valentine's Day with my husband and children, I will also be thinking of all those wonderful women who've helped me get to this place of contentment in my life. Good friends are such wonderful blessings!
Thanks so much for stopping by today!
Products Used:
Paper: Real Red, Basic Black, Whisper White card stock (Stampin' Up!);
Neenah Classic Crest Solar White 110 lb. card stock (for inner liner, not pictured)
Ink: Real Red Classic Ink, Basic Black Craft Ink (Stampin' Up!)
Stamps: Deadbeat Designs (candy image); Hambo Stamps (sentiment)
Tools and Accessories: Nestabilities Standard Circles Large (Spellbinders); 1 1/4" deckle punch (McGill);
clear embossing powder (Mrs. O'Leary's); Glossy Accents (Ranger); Stampin' Dimensionals (Stampin' Up!)
Tuesday, January 22, 2013
Vintage Valentine
Happy Tuesday! It's bright and sunny but very cold here today. We were blessed with beautiful weather on Saturday (no jackets! short sleeves!) but today we're back to bundling up in coats and hats.
Over the weekend I stopped in at my local scrapbooking and stamping store. Sometimes I drop in just to get inspiration, sometimes to pick up something I need and sometimes just to relax and enjoy a little kid-free quiet time. The owner is very knowledgeable and friendly, and this weekend she pointed me toward some of the cutest 12x12, two-sided Valentine-style paper I've ever seen! As soon as I saw it, I knew I would be making vintage Valentine's Day cards with it. Vintage usually isn't my style, but this paper just begs to be distressed!
This week's Clean and Simple (CAS) challenge at Splitcoast Stampers is a sketch challenge (view the challenge sketch HERE to play along). I chose to flip the sketch on its side and use one of the images from this delightful patterned paper in place of stamping The challenge with CAS is to use very minimal stamping, images and embellishments while still making a beautiful card, and I've found vintage CAS to be even harder. I had to restrain myself to keep from adding elements to this card!

(I apologize for the poor picture quality. I use natural light so I really need to photograph at just the right time of day to get a good picture, but I was running behind and missed the best light.)
I started by cutting the image and distressing it. Next I cut a mat from the reverse side of the paper, distressed it and adhered the image to the mat. I die cut a border from natural white card stock and distressed that, too. I attached the border to the larger panel and added three brads, then attached the entire piece to a dark brown card stock base, which was cut slightly smaller than A2 size for a better fit.
There are several other Valentine images on the 12x12 patterned paper and I can't wait to make cards using the other images. I liked this paper so much that I hurried back to the store to buy a few more sheets before it's sold out!
Thanks for stopping by today. I hope you stay warm and cozy!
Products Used:
Paper: Collection: Lovely "Greetings" Two-Sided Paper (Authentique);
Classic Crest Natural White 80 lb. card stock (Neenah); dark brown card stock (unknown)
Ink: Walnut Stain Distress Ink (Tim Holtz/Ranger)
Tools and Accessories: Borderabilities Jumbo Scalloped Petite Borders (Spellbinders); brads (Recollections)
Monday, January 21, 2013
Cork and Chalkboard Valentine
Happy Monday! I spent part of the weekend working on the reorganization project in my craft room, but I managed to carve out a little time late last night to put together a card for a couple of challenges at Splitcoast Stampers. The Ways to Use It challenge asked us to use cork on a card. I have a big roll of cork but I never think to use it on my cards, so this was a fun challenge.
The other challenge I tried is a new one to me, the Fan Club Central Theme challenge. This month's theme is "dirty laundry", and let me tell you, this one hits close to home for me! The only way to access my craft room is through the laundry room, so I have to walk past Mount St. Laundry whenever I want to make a card! One of the options was to make a card using color combinations from the clothes in our laundry baskets. I surveyed my laundry and noticed a lot of black and red, so I decided to use those colors for this card (and white, in honor of the big pile of towels my kids used for their baths!).
I also have a "dirty little secret" (another challenge option): I used a little piece of plain old Scotch tape to clean up the extra bits of embossing powder that stuck to my black card stock before I heat embossed it. I've found it pulls away the excess powder much cleaner than the brush I usually use. I also used Scotch tape to hold the twine in place on the back of my red panel. That stuff is handy!
Here's my card:

I started by die cutting the cork to make a frame, then set it aside to make my chalkboard (to see more about the chalkboard technique, please see this post). I stamped my image and sentiment in white craft ink on black card stock, then heat embossed them using white embossing powder. I sponged white craft ink over the panel and rubbed it with a towel to create the look of eraser marks. I adhered the black panel to the cork frame, then attached the framed piece to a panel of Real Red card stock. I wrapped red and white baker's twine around the red panel and secured it with Zots and a decorative white button. Finally, I attached the red panel to a heavy white card base.
I'm really excited by this month's Fan Club challenges ("laundry" is normally a dirty word at my house, no pun intended!) and look forward to trying other options in the challenges.
Thanks for stopping by today!
Products Used:
Ink: Craft White (Stampin' Up!)
Stamps: Heart (Stampabilities); Be My Valentine (Hambo Stamps)
Paper: Classic Crest Solar White 110 lb. card stock (Neenah);
Real Red card stock (Stampin' Up!); black card stock (unknown)
Tools and Accessories: Stampin' Emboss Powder White (Stampin' Up!); frame die (Sizzix);
Zots (Therm-O-Web); baker's twine (purchased from Strands Etcetera on Etsy); cork; button
Subscribe to:
Posts (Atom)