I'm Amy, a stay-at-home mom by day and a crafter by night. After a day of chasing my kids around the house, I escape to my craft room for a few hours of creating while they sleep. Thanks for joining me in my little corner of the crafting world!
Showing posts with label black. Show all posts

Tuesday, February 5, 2013

Mixed Media Valentine

Happy Tuesday!  After a few days away from crafting while I nursed a migraine (oh, those evil weather changes) and rushed my way through a busy weekend, I finally had a chance to play in a brand-new challenge at Splitcoast Stampers, the Mix-Ability Challenge.  This one is so much fun!  It challenges us to use mixed media in projects, but even better, it teaches us how to use mixed media in projects.  Lydia even created a fantastic video for the challenge, which you can see HERE.

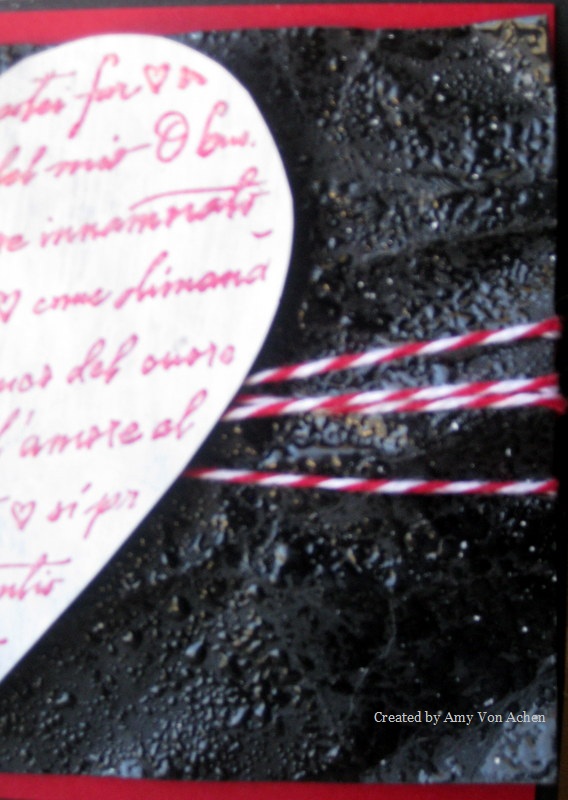
This week's challenge is "Yin Yang".  We're asked to use something matte and something shiny on our cards.  Since Lydia's video showed how to use gesso and I've been wanting to try gesso on a card, I used that medium to create a matte background for my heart.  I have two "shiny" things on my card, one subtle and one not-so-subtle.  I used heat embossing on my heart and I created a "raindrop" background using crinkled paper, Versamark and Glassy Glaze.  

Here's my card:


Here's a close-up of the heart:


And hopefully you can see the shiny background a bit better here:

I started by applying gesso to a piece of patterned paper that was black with white hearts.  (I was hoping a bit of the pattern would show through, but I was a bit too heavy-handed with the gesso.)  I used a heat gun to dry the panel because I'm too impatient to watch paint dry!  I stamped my image over the gesso with Rose Red craft ink and heat embossed it with clear embossing powder, then cut around the image to create the heart shape.  Because the patterned paper is very light-weight, I cut a smaller-sized heart from chipboard (so it wouldn't be noticeable) and adhered it to the back of the stamped heart to give it some stability on the card.

Next I got to work on my shiny panel.  I spritzed a piece of black card stock with water, then crumpled it.  Once it was nicely crumpled, I flattened it out a bit and ran my heat gun over it to be sure all the water had dried.  I rubbed Versamark all over it using the direct-to-paper method, then applied Glassy Glaze, which is like a chunky, shiny embossing powder.  I heat set the Glassy Glaze to create a shiny, wet look that reminds me of raindrops. 

I wrapped red and white baker's twine around the black piece.  I adhered the black piece to a panel of red card stock, then adhered the red piece to a black card base that was cut to 4" x 5 1/2" (slightly smaller than an A2 card). I attached the heart to the shiny black panel using thick foam dimensionals and placed Zots on top of the dimensionals to really help the heart stick to the black panel.

I had so much fun playing with new tools for this card!  I have really enjoyed making different styles of valentines over the past couple of weeks, especially since I can use my favorite color combo (black, white and red) so easily at this time of year!  If you want to learn how to use new mediums and explore your creativity a bit, too, I hope you'll give the new Mix-Ability Challenge a try!  

Thanks for stopping by today!

Products Used:
Stamp: Amore HeartPrint (Hero Arts)
Ink: Rose Red Craft Ink (Stampin' Up!). Versamark (Tsukineko)
Paper: B&W Doodle Hearts (The Paper Studio); red and black card stock (unknown)
Tools and Accessories: Gesso (O'Leary Paint); clear embossing powder (Mrs. O'Leary's); Glassy Glaze (Stampin' Up!); baker's twine (Strands, Etc.); 3D Foam Squares and Zots (Therm-O-Web); chipboard


Monday, January 21, 2013

Cork and Chalkboard Valentine

Happy Monday!  I spent part of the weekend working on the reorganization project in my craft room, but I managed to carve out a little time late last night to put together a card for a couple of challenges at Splitcoast Stampers.  The Ways to Use It challenge asked us to use cork on a card.  I have a big roll of cork but I never think to use it on my cards, so this was a fun challenge.  

The other challenge I tried is a new one to me, the Fan Club Central Theme challenge.  This month's theme is "dirty laundry", and let me tell you, this one hits close to home for me!  The only way to access my craft room is through the laundry room, so I have to walk past Mount St. Laundry whenever I want to make a card!  One of the options was to make a card using color combinations from the clothes in our laundry baskets.  I surveyed my laundry and noticed a lot of black and red, so I decided to use those colors for this card (and white, in honor of the big pile of towels my kids used for their baths!).  

I also have a "dirty little secret" (another challenge option): I used a little piece of plain old Scotch tape to clean up the extra bits of embossing powder that stuck to my black card stock before I heat embossed it.  I've found it pulls away the excess powder much cleaner than the brush I usually use.  I also used Scotch tape to hold the twine in place on the back of my red panel.  That stuff is handy!

Here's my card:


I started by die cutting the cork to make a frame, then set it aside to make my chalkboard (to see more about the chalkboard technique, please see this post).  I stamped my image and sentiment in white craft ink on black card stock, then heat embossed them using white embossing powder.  I sponged white craft ink over the panel and rubbed it with a towel to create the look of eraser marks.  I adhered the black panel to the cork frame, then attached the framed piece to a panel of Real Red card stock.  I wrapped red and white baker's twine around the red panel and secured it with Zots and a decorative white button.  Finally, I attached the red panel to a heavy white card base.  

I'm really excited by this month's Fan Club challenges ("laundry" is normally a dirty word at my house, no pun intended!) and look forward to trying other options in the challenges.

Thanks for stopping by today!

Products Used:

Ink: Craft White (Stampin' Up!)
Stamps: Heart (Stampabilities); Be My Valentine (Hambo Stamps)
Paper: Classic Crest Solar White 110 lb. card stock (Neenah); 
Real Red card stock (Stampin' Up!);  black card stock (unknown)
Tools and Accessories: Stampin' Emboss Powder White (Stampin' Up!); frame die (Sizzix);
Zots (Therm-O-Web); baker's twine (purchased from Strands Etcetera on Etsy); cork; button

Friday, January 4, 2013

Chalkboard Technique with Rick Rack

Happy Friday!  Today's card was a bit of an experiment.  One of my creative goals in 2013 is to try lots of new techniques (not just pin them on my Pinterest boards!), and this week's Try a New Technique challenge at Splitcoast Stampers intrigued me.  For this challenge, we were asked to use the chalkboard technique.  I also wanted to play along with this week's Ways to Use It challenge (also at Splitcoast Stampers) which asked us to use things that are new to us, so I designed a background using some new rick rack I picked up while Christmas shopping.  I like the wavy effect of the rick rack against the solid panels of the sentiment:  


To make the chalkboard panel, I ran my Embossing Buddy over a piece of black card stock, then stamped my sentiment in white craft ink.  I added white embossing powder and heat embossed the sentiment.  I set it aside to dry for a few moments, then sponged white craft ink on the panel to create the effect of chalk dust.  Since craft ink is slow-drying, I set the stamped panel aside and started working on my background.  I ran my rick rack through my Xyron Create-A-Sticker to get a good line of adhesive on it, then attached it in rows to a black card base.  I attached my sentiment panel to a piece of white card stock and trimmed it to fit, then attached it with Stampin' Dimensionals to the card base.  To add just a bit of color, I punched two hearts from a piece of shimmery hot pink card stock and added them to the sentiment panel.

I really had fun with this technique and plan to try it again soon.  I love that it uses ink in place of chalk (no chalk dust!) and looks quite realistic in person.  This stamp is one of my new favorites with its lovely message (you may remember it from this post).  If you want to see more cards using the chalkboard technique, I have a few pinned to my "cards" board on Pinterest.  Feel free to follow me and see more examples of this fun technique!

Thanks for stopping by today! 

Products Used:

Paper: Whisper White card stock (Stampin' Up!); black card stock from stash;
shimmery hot pink card stock from stash
Stamp: 7 Gypsies/Hampton Art
Ink: Craft White (Stampin' Up!)
Tools and Accessories: Baby Rick Rack (Wright's); white embossing powder (Stampin' Up!);
heart punch (Marvy Uchida); Stampin' Dimensionals (Stampin' Up!)


Monday, December 17, 2012

Something Has Changed...

Today's post is much different than the post I'd anticipated writing.  Today's card is a Valentine's Day card, and I'd planned to write about this romantic, sweet sentiment I found that I just knew would be perfect for Valentine's Day cards for Operation Write Home.  I wanted to share this card with you in such a different way than I will today.  But this card was made prior to the horrific events that unfolded at Sandy Hook Elementary School.  This card was made before my heart was broken.  And so today's post is not the post I'd planned to write.

I was picking up my son from school on Friday when I heard that a gunman had opened fire in an elementary school in Connecticut.  I was chatting on the phone with my sister and watching my son walk out with his class when my sister asked if I'd heard about the shooting.  She didn't have any details or know of any casualties at that point, so I pushed it to the back of my mind and figured I'd hear more later.  I got out of the car, spoke with the teacher for a few moments and walked my son to the car while we talked about his day.  It was as normal as normal could be, until we got home and I saw the news for myself.  Then nothing was normal anymore.

So while today's card was created as a Valentine, today its message takes on a special significance and reaches far beyond a sweet Valentine's Day sentiment to true, deep, devoted and determined love for all who hold a special place in our hearts:


I'm holding those I love a little tighter today.  My kids are getting extra hugs and kisses, my husband is getting extra attention, and I'm focusing on present moments instead of worrying about all the stressful parts of holiday preparations.  I'm taking my kids out for ice cream and going on "adventures" with my son.  I'm having deep, important conversations with my husband.  I'm reaching out to friends and family.  I'm holding on to those I love, and they are holding on to me.  God has blessed me with wonderful people to love, and for the moment, at least, we are here on this journey together.  I don't want to waste a single opportunity to hold them close while I still can.

If you're still reading this post, bless you!  I always provide a recipe for my cards, and today will be no exception.  Here's how I made this card:

I started with a base of black card stock and covered the front with patterned paper.  I stamped the sentiment in Memento Tuxedo Black on white card stock and adhered it to a piece of black card stock.  I die cut a scalloped border from white card stock, then adhered the sentiment panel and border to the card front.  I added some shimmer spray to the sentiment panel for this card, but I plan to make another card like this without the shimmer spray so I can donate it to Operation Write Home.  This card is quick and easy, but its message is powerful.
 
I am submitting this card for the current challenge at Shopping Our Stash (use a sentiment as the focal point of the card). 

Thanks for taking the time to visit and read my post today.  I hope the message of this card found its way to your heart.


Products Used:
 
Ink: Memento Tuxedo Black
Stamp: 7 Gypsies/Hampton Art
Paper: Solar White Classic Crest 110 lb. (Neenah); "My Heart"
patterned paper (Karen Foster Designs); black card stock (unknown)
Tools and Accessories: Big Shot (Sizzix); Die-Namics Open Scallop Edge (MFT);
Sheer Shimmer Frost Spray (Tsukineko)


Thursday, October 25, 2012

Once Upon A Time

No matter how many color combinations I explore, I often gravitate back to a couple.  One combo I use often is black, white and red.  I just love this color combination!  So here it is again, this time on a card for a challenge at a brand-new blog, 'ABC' Challenges 

Since this is their first challenge, they required us to use something new on our cards, whether it be something we actually purchased new or something that we just haven't used before.  Since I'm working on love-themed cards for Operation Write Home, I thought this would be the perfect time to try out a new die I purchased.  I bought it (along with several others) at a scrapbooking sale where crafters sell off supplies they are no longer using.  I came home with several dies this year, which was really exciting!  (I love getting a good deal almost as much as I love making cards!)  So the heart die cut on this card is my "new" for this challenge.  This ribbon might be a "new" also, because I don't recall ever using it before.  It was in my stash and who knows how long it's been there?!

Here's my card:


I really love this sentiment and the set that it comes from.  The stamp is definitely not new to me, as it's one of the stamps I used for my wedding.  This one always brings a smile to my face when I use it.

I started by stamping my background in craft ink on white card stock, then heat embossing it with clear embossing powder.  I wrapped my ribbon around the white panel, die cut my heart, stamped my sentiment and added some rhinestones to the heart.  I adhered the heart to the panel with dimensionals, then adhered the panel to a black card base.  I think this card would be appropriate as a general "I love you" card or as Valentine's Day card.

Here's a tip about dimensionals: For this card I used Stampin' Dimensionals (Stampin' Up!) to adhere the heart to the panel.  I love these dimensionals because they are only 1/16" thick.  I have purchased several other brands and many of those are 1/8" thick, which I feel is often too thick.  If you buy 1/16" thick dimensionals, you can always stack them to make them thicker if you want a different effect.  Stampin' Up! is not the only company who offers dimensionals in 1/16" thickness, so if you're shopping for another brand, just check the labels carefully.  You can also find tape that offers a dimensional effect, but again, check the thickness.  It's not such a big deal in cards that I'm hand-delivering, but when they go through the mail, that little bit of extra thickness is not always desireable. 

My craft room table is a bit of a disaster this week, so I'm planning to do some reorganizing before I do any more stamping.  I hope to have another card to post for you in the next couple of days.

Thanks for stopping by!

Products Used:

Background Stamp: Tres Chic (Stampin' Up!)
Background Ink: Craft Black (Stampin' Up!)
Sentiment Stamp: Fairy-Tale Wedding (Stampin' Up!)
Sentiment Ink: Memento Tuxedo Black (Tsukineko)
Die: Hearts, Tipsy (Sizzix)
Tools: Big Shot (Sizzix); Mrs. O'Leary's Clear Embossing Powder; rhinestones;
ribbon; Stampin' Dimensionals (Stampin' Up!)


Friday, October 19, 2012

My First Midweek Throwdown Entry!

I completed my very first challenge for Operation Write Home!  I am so excited!!  I have started making cards to donate and decided using challenges will help me accomplish my goal faster.  I chose to do the Midweek Color Throwdown over on their blog, Stars and Stamps.  The challenge this week was to make a card using black and white with a "pop" of either red or green.  I was surprised at how difficult I found this challenge, considering that one of my favorite color combinations is black, white and red.  In fact, I've blogged about a couple of cards using these colors recently (HERE and HERE).  I'm going to blame my creative frustration on the fact that my baby is teething so I'm not sleeping much! 

I decided to make a "general" card, as our deployed servicemen and servicewomen can always use "any occasion" cards.  This stamp is from a set that really frustrates me because the font is intentionally messy. Whenever I use it I find myself trying to correct the ink mistakes, only to realize they are not mistakes, they're part of the design.  Being a bit of a perfectionist, this drives me batty! 

Here's my card:


See how it looks like my stamp skipped a bit or I wiggled it too much?  I promise that's how the stamp is designed!  I stamped the sentiment on white card stock, then die cut it using Nestabilities in my Big Shot.  I cut red and black card stocks with the same Nestabilities set, then layered the pieces.  I embossed the white card stock in my Big Shot, adhered the stamped piece to it, and tied some baker's twine around it.  I adhered the white panel to the black card base.  This is a quick Clean and Simple card, which seems to be my style this month.  This stamp set comes with four different sentiments, so I could easily make several different cards with this CAS layout. 

That's all for today!  We have a busy weekend ahead of us, but I hope to get some stamping time in to finish another project that's waiting on my desk. 

I hope you have a great weekend!  Thanks for stopping by!
 
Products Used:
 
Stamp: That's Nice (Stampin' Up!)
Ink: Memento Tuxedo Black
Paper: Various sources
Tools: Spellbinders Nestabilities Labels One; Divine Swirls Embossing Folder; twine


Monday, October 15, 2012

Trick or Treat: It's Pumpkin Time!

In the past I haven't put a lot of energy into Halloween.  I usually jump right into making winter and Christmas cards at this time of year.  But my little boy has become enthralled with pumpkins and costumes and trick-or-treating, so this year I'm making more of an effort to enjoy the fun of Halloween.  I picked up a few Halloween stamps from the dollar bin at Michael's (and they were 40% off, so this frugalista was pretty excited!).  I figured that if they didn't stamp well, I'd only wasted 60 cents on each of them, but I have actually been surprised by how well they stamp.  The small pumpkin and the sentiment on this card are from my dollar-bin shopping spree, so you can see for yourself how well they stamp.

This card was created for the very first challenge offered by a brand-new blog, CAS(E) This Sketch.  Here is the sketch for this week's challenge:

 
Isn't that a fun sketch?  So many possibilities with this one!  CAS(E) this Sketch posts challenges for the Clean and Simple style. Click CAS(E) This Sketch to join in the fun!
 
Here is my card for the challenge:
 
 
This card is a very clean and simple (CAS), one-layer card.  The images and sentiment are stamped directly on the white card base.  A one-layer card can be a great option if your base paper weight isn't heavy enough to hold a lot of layers and embellishments, although that's not the only reason to make a one-layer card.  I find one layer cards to be quite challenging because it's very difficult to hide mistakes!
 
I stamped the sentiment first, then added the pumpkins.  Since the font on the sentiment gives a slight curve to the words, I followed that pattern and stamped my pumpkins in a slightly curved line, too.  (Sure, we'll go with that.  Sounds a lot better than admitting I couldn't stamp them in a straight line if my life depended on it!)  I colored the pumpkins with watercolor crayons.  The trick with the crayons is to pick up the color from the crayon with your slighty wet brush and move the color from the brush to your paper, rather than coloring with the crayons directly on the paper.  The more water you use, the lighter the color will be, so for these brighter colors I used very little water on my brush..  I think the crayons provide more intense color than watercolor pencils, and I really like using them.
 
If CAS isn't your usual style, I'd encourage you to give it a try.  I definitely find it challenging (especially the part about leaving a lot of open space...that goes against the grain for me), but it's also really nice to complete a card and feel satisfied with it after just one or two layers.  Sketches are really helpful in trying out a new style, so I recommend using a sketch to get comfortable with the CAS concept.
 
I'm working on a card for another challenge that uses a technique I've never tried before, and I hope to have that card ready to show you tomorrow.  Thanks for visiting today! 
 
Products Used:
 
Paper: Whisper White card stock (Stampin' Up!)
Stamps: Small pumpkin (Stampin' Up!), large pumpkin and sentiment (Craft Smart at Michael's)
Ink: Memento Tuxedo Black
Accessories: Watercolor Crayons (Staedtler)
Technique:Watercoloring

Wednesday, October 10, 2012

Anniversary Card for My Husband

Recently my husband and I celebrated our fifth wedding anniversary.  He's the kind of guy who thoughtfully remembers the little details that I often forget, so I tried very hard to create a card with details that were reminiscent of our wedding.  Our wedding colors were black and white, and my bridesmaids and I carried red roses to add a splash of color.  I recreated those colors on this card.  The sentiment is from a set I used to stamp the napkins for our wedding.  I tried to keep the embellishments to a minimum, as I didn't want to "girly" this card up too much for my husband!  Here's the card I made for him:


I stamped the background stamp in craft ink on white card stock, then heat embossed it with clear embossing powder.  I attached a piece of red ribbon (repurposed from a package I received recently...I always save those ribbons!) to the embossed panel.  I used my Big Shot and a Sizzix die to cut rectangles of black and white card stock, stamped my sentiment and adhered the stamped piece to a larger black rectangle.  I added black brads to the corners and adhered that piece to the embossed card stock using dimensionals.  I then attached the whole panel to a card base made of black card stock and added a white liner to the inside of the card.

My husband and I have been blessed with beautiful children, a strong support system of family and friends, and a Savior who has carried us through the ups and downs of life.  There's a whole lot of love in our house, and life around here is always exciting.  If that's not worth taking the time to make a special card, I don't know what is!

Thanks for stopping by today!

Products used:
Background Stamp: Soft Swirls (Stampin' Up!)
Sentiment Stamp: Love Matters (Stampin' Up!)
Ink: Basic Black Craft ink (Stampin' Up!), Memento Tuxedo Black
Embossing Powder: Clear (Mrs. O'Leary's)
Embellishments: Black brads, red ribbon


Friday, October 5, 2012

The Snowman's Second Life

Today's card was created for "What Are the Odds?", this week's Ways to Use It Challenge at Splitcoast Stampers.  The requirement for this card was to use an odd number of some element on the card.  I used three snowflakes for my "odd".  Here's my card:


I have a box of unfinished projects in my craft room, and every once in awhile I will unearth a piece of a project and give it a second life.  For this card, I dug into the box and found this adorable snowman image.  I had stamped it, colored it with watercolor pencils, added some Stickles and layered it on red and black card stock, and then for some reason I never finished whatever project I had intended it for.  It's nice to repurpose your own work sometimes, so I decided to use this piece to make a new card.

I cut a larger piece of the same textured red card stock and adhered it to a black card base.  Using a black gem, white fiber and dimensionals, I attached the image to the card by hanging it from the gem.  I die cut three snowflakes and added them to the card.  I stamped the sentiment on white card stock and layered it on black card stock, then adhered that piece to the card base.  I finished by adding more Stickles to the snowman and snowflakes.  It's hard to see in the picture, but those Stickles really add some snowy sparkle to the card.

This card has reminded me that winter will be here soon, which means I really need to get cracking on my Christmas shopping!  That sounds like the perfect excuse to go shopping this weekend, doesn't it?

Thanks for stopping by! 
 
Products used on this card:

Snowman Image: Snow Angels (Stampin' Up!)
Sentiment: Close to My Heart
Ink: Memento Tuxedo Black
Snowflakes: ProvoCraft
Other: Watercolor pencils, black gem, white fiber, Stickles