I'm Amy, a stay-at-home mom by day and a crafter by night. After a day of chasing my kids around the house, I escape to my craft room for a few hours of creating while they sleep. Thanks for joining me in my little corner of the crafting world!
Showing posts with label rhinestone. Show all posts

Wednesday, February 20, 2013

Comfort for Kay

It's finally snowing!  We really need the moisture and it just hasn't felt much like winter this year, so the snow is pretty exciting!  School has already been canceled for tomorrow and I'm hoping my husband will work from home so we can all hunker down for a good, old-fashioned Snow Day!

Last night I received a card drive request for a sweet lady named Kay.  Kay turned 60 years old earlier this week and had been looking forward to retirement with her husband.  Sadly, Kay was diagnosed with a very rare and very aggressive cancer a couple of months ago.  Treatment has been unsuccessful and the cancer has now invaded almost every part of her body.  It appears Kay's battle will be coming to an end soon, as the doctors believe she has a month or less to live.  We've been asked to send cards to make her birthday week very special and to show her some love, comfort and encouragement in her final days.

This was a very, very hard card for me to make.  What comfort can I offer someone who is nearing the end of life, especially someone I've never met?  I turned to the greatest source of comfort I could offer: the promises of Scripture.  I hope this verse will bring comfort to her in her final days.

Here's my card:


I wanted to keep this card Clean and Simple (CAS) and make the verse the focal point.  I worked from the inside out this time, starting with the verse.  I stamped it in black ink on white card stock, then die cut it with a scalloped rectangle die.  I had a scrap of shimmery black card stock in my stash, so I die cut a larger scalloped rectangle and attached the verse to it.  I used another scrap of shimmery black to die cut my flourishes.  I found a lovely scrap of magenta-colored patterned paper in my stash, so I wrapped a piece of ribbon around it and layered it on the card front.  I adhered my sentiment panel over the ribbon, then gently slid my flourishes into place and attached them to the card.  Finally, I added a few tiny rhinestones to the flourishes for just a little bit of sparkle (this photo doesn't do the sparkly rhinestones justice).

This verse brings me comfort and hope every time I read it, and I pray that its message will help Kay, as well.  If you are so inclined, please say a prayer or send comforting thoughts out to this sweet lady and her family.

Thanks for stopping by today, and extra-special thanks to those who take the time to leave a comment!


Products Used:
Stamp: Scripture Series 3 (Our Daily Bread Designs)
Ink: Memento Tuxedo Black (Tsukineko)
Paper: Jubilee Magenta Accent (K&Company); black shimmery card stock (from a scrap bag at cutcardstock.com); black card stock (unknown)
Tools and Accessories: Nestabilities Classic Scalloped Rectangles - Small and Large (Spellbinders); Scribbles Swirls Sizzlets (Sizzix); ribbon (Offray); tiny rhinestones (unknown)




Thursday, November 29, 2012

Glittery Embossed Christmas Stocking

Today's card incorporates a fun technique that I'm excited to share with you!  I created this card for this week's Try a New Technique Challenge at Splitcoast Stampers.  We were challenged to use the Glittery Embossing technique, which uses dry embossing, glitter glue and a brayer.  What fun! 

Here's my card:


I decided to use a square card to accommodate my large scalloped circles, so I cut a 5 x 5 card base from Real Red card stock.  I cut a 4.75 x 4.75 piece of Whisper White card stock to layer on top of the base (in this photo it looks more like silver than white, but it's actually a white square).  I die cut a piece of silver card stock and a piece of Real Red card stock with scalloped circle dies.  For the glittery embossing, I dry embossed the red circle with the Snowburst embossing folder in my Big Shot and set it aside.  I squirted some some Stickles (glitter glue) on a piece of scrap card stock and spread it out a bit, then ran my brayer through the Stickles until it was completely covered.  (I used Star Dust Stickles to create an icy look, but it's hard to see in this picture.)  I ran my brayer several times over my embossed red scalloped circle to deposit the glitter glue all over the embossed piece, then set it aside to dry. 

Next I stamped my stocking in Real Red on another piece of white card stock and die cut it.  I added silver glitter glue to the top and tiny rhinestones to the center of each snowflake.  I set the stocking aside to allow the glitter glue to dry overnight.

The next day, I adhered the layers to each other and attached the stocking with dimensionals (I added a bit of Tombow Mono Multi glue on top of the dimensionals because I find that helps adhere things to embossed backgrounds).  I curled the edges of the red embossed piece to add even more dimension.  I added a rhinestone to each corner of the card and a white liner to the inside panel.  Easy peasy!  Although it took two days to create this card (to allow the glitter glue to dry), I didn't spend a lot of time working on it at each session. 

I have a few tips to share with you today, all based on my own mistakes while making this card.  First, if you are going to die cut and emboss a piece of card stock, be sure to cut first, emboss second.  If you do it the other way, your embossing will get squished.  Second, if you smudge your ink, there are ways to fix it.  I smudged the red on my stocking onto the white area around it (in a very small place, but it really bothered me) so I used a white gel pen to cover up the red marks.  If you layer it on slowly, it usually works.  I got a little too ambitious, however, and ended up getting the white gel ink on the red stocking...grrrr.  So I used a tip I learned from another blogger recently: I grabbed my blender pen and some Real Red ink and blended the red ink over the white marks.  It worked like a charm!  I can't remember which blogger shared the tip, but she successfully uses her blender pen to fill in gaps on stamped images that have "bald spots" where the ink didn't transfer.  This is a pretty handy trick to have up your sleeve!

I hope to try the glittery embossing technique on some larger panels that I can use to make my own background papers.  There are many options and variations on this technique, and I hope you will give it a try, too!

Thanks for stopping by!

Products Used:
 
Ink: Real Red Classic Dye Ink (Stampin' Up!)
Paper: Real Red, Whisper White card stock (Stampin' Up!); silver card stock (unknown)
Stamp and Matching Die: Hero Arts Stamp & Cut Christmas Stockings set
Tools and Accessories: Nestabilities Scalloped Classic Circles Large (Spellbinders); Star Dust Stickles (Ranger);
Silver Glitter Glue (Studio G); Big Shot (Sizzix); Snowburst embossing folder (Sizzix/Stampin' Up!);
Stampin' Dimensionals (Stampin' Up!); Mono Multi glue (Tombow); rhinestones


Thursday, October 25, 2012

Once Upon A Time

No matter how many color combinations I explore, I often gravitate back to a couple.  One combo I use often is black, white and red.  I just love this color combination!  So here it is again, this time on a card for a challenge at a brand-new blog, 'ABC' Challenges 

Since this is their first challenge, they required us to use something new on our cards, whether it be something we actually purchased new or something that we just haven't used before.  Since I'm working on love-themed cards for Operation Write Home, I thought this would be the perfect time to try out a new die I purchased.  I bought it (along with several others) at a scrapbooking sale where crafters sell off supplies they are no longer using.  I came home with several dies this year, which was really exciting!  (I love getting a good deal almost as much as I love making cards!)  So the heart die cut on this card is my "new" for this challenge.  This ribbon might be a "new" also, because I don't recall ever using it before.  It was in my stash and who knows how long it's been there?!

Here's my card:


I really love this sentiment and the set that it comes from.  The stamp is definitely not new to me, as it's one of the stamps I used for my wedding.  This one always brings a smile to my face when I use it.

I started by stamping my background in craft ink on white card stock, then heat embossing it with clear embossing powder.  I wrapped my ribbon around the white panel, die cut my heart, stamped my sentiment and added some rhinestones to the heart.  I adhered the heart to the panel with dimensionals, then adhered the panel to a black card base.  I think this card would be appropriate as a general "I love you" card or as Valentine's Day card.

Here's a tip about dimensionals: For this card I used Stampin' Dimensionals (Stampin' Up!) to adhere the heart to the panel.  I love these dimensionals because they are only 1/16" thick.  I have purchased several other brands and many of those are 1/8" thick, which I feel is often too thick.  If you buy 1/16" thick dimensionals, you can always stack them to make them thicker if you want a different effect.  Stampin' Up! is not the only company who offers dimensionals in 1/16" thickness, so if you're shopping for another brand, just check the labels carefully.  You can also find tape that offers a dimensional effect, but again, check the thickness.  It's not such a big deal in cards that I'm hand-delivering, but when they go through the mail, that little bit of extra thickness is not always desireable. 

My craft room table is a bit of a disaster this week, so I'm planning to do some reorganizing before I do any more stamping.  I hope to have another card to post for you in the next couple of days.

Thanks for stopping by!

Products Used:

Background Stamp: Tres Chic (Stampin' Up!)
Background Ink: Craft Black (Stampin' Up!)
Sentiment Stamp: Fairy-Tale Wedding (Stampin' Up!)
Sentiment Ink: Memento Tuxedo Black (Tsukineko)
Die: Hearts, Tipsy (Sizzix)
Tools: Big Shot (Sizzix); Mrs. O'Leary's Clear Embossing Powder; rhinestones;
ribbon; Stampin' Dimensionals (Stampin' Up!)


Tuesday, October 23, 2012

Hearts Full of Love

Today's card is a CASE (Copy and Share Everything) card for the Featured Stamper Challenge at Splitcoast Stampers.  Every week a stamper is chosen to be the Featured Stamper, and the challenge participants choose one of his/her cards to CASE.  It is always inspiring to look through a Featured Stamper's gallery! 

Here is a link to the Featured Stamper's original card:
Wish Big

And here is my card:


When you CASE a card for this challenge, you are asked to change at least two elements.  I chose to make several changes while still following the design of the card.  I used her layout almost identically and I matted the card front to a white base card, just as the original card maker did.  The original card had pink and blue and a "wish big" sentiment.  I wanted to make a love-themed card for Operation Write Home, so I used heart papers and a "love" sentiment.  I used a slightly different border die and a Nestabilities label for my sentiment.  The original card maker used a flourish of rhinestones and I just used a small row of them, as that's what I had on hand. 

I dry embossed the sentiment panel after cutting it with my Nestabilities.  I just love how a little detail like dry embossing can take a basic shape up a notch.  But no matter how hard I tried, I could not get those rhinestones to sparkle in my pictures!  You'll just have to trust me that they are clear rhinestones and they add just a touch of sparkle and shine to this card.

I always find it very challenging to mix patterned papers, but these hearts were similar enough that I thought they would work together and complement each other. It's fun to stretch outside of the box of my usual style and borrow someone else's ideas for a card!   

Thanks so much for stopping by!

Products Used:
 
Stamp: Hope Is... (Stampin' Up!)
Ink: Memento Espresso Truffle (Tsukineko)
Paper: Unknown
Tools: Big Shot (Sizzix); Nestabilities Labels Eighteen (Spellbinders);
Die-Namics Dainty Lace Border (My Favorite Things); rhinestones

Friday, September 14, 2012

Scripture Inspiration

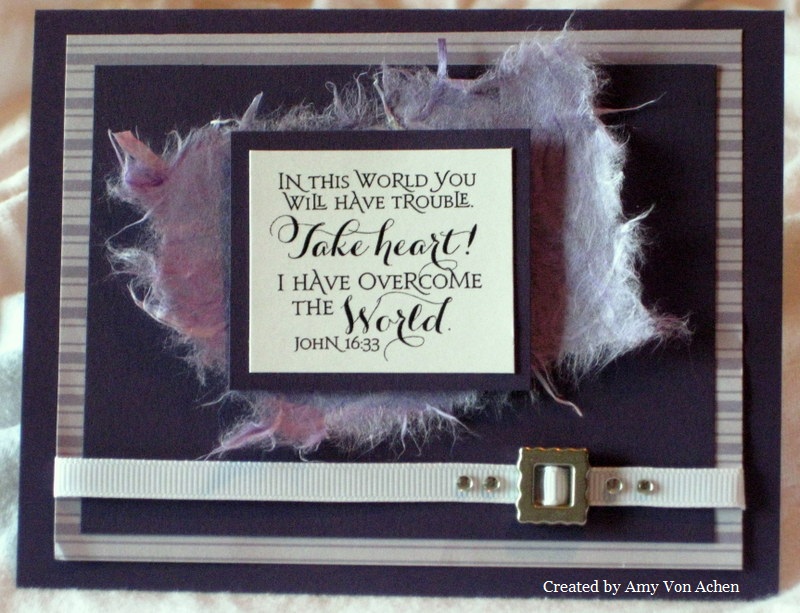
Today I want to share a couple of cards I made with stamps from the new Scripture Series 3 set from Our Daily Bread Designs.  This set is very special to me as I contributed one of the verses for it!  The verse stamped on this first card was my contribution, and as a special treat, I was able to make this card for the September release on their blog:
 

This verse has been one of my favorites since I was a teenager and always brings me comfort in the midst of difficulty.  I highlighted it with mulberry paper, which is one of my favorite papers to use. 
 
I love the combination of purple, silver and white in my cards. In fact, I liked it so much that I made another card using the same color combo and a different verse from the same collection:


I hope these verses inspire your day the way they have inspired mine!  Thanks for visiting!