I'm Amy, a stay-at-home mom by day and a crafter by night. After a day of chasing my kids around the house, I escape to my craft room for a few hours of creating while they sleep. Thanks for joining me in my little corner of the crafting world!
Showing posts with label challenge. Show all posts

Tuesday, February 5, 2013

Mixed Media Valentine

Happy Tuesday!  After a few days away from crafting while I nursed a migraine (oh, those evil weather changes) and rushed my way through a busy weekend, I finally had a chance to play in a brand-new challenge at Splitcoast Stampers, the Mix-Ability Challenge.  This one is so much fun!  It challenges us to use mixed media in projects, but even better, it teaches us how to use mixed media in projects.  Lydia even created a fantastic video for the challenge, which you can see HERE.

This week's challenge is "Yin Yang".  We're asked to use something matte and something shiny on our cards.  Since Lydia's video showed how to use gesso and I've been wanting to try gesso on a card, I used that medium to create a matte background for my heart.  I have two "shiny" things on my card, one subtle and one not-so-subtle.  I used heat embossing on my heart and I created a "raindrop" background using crinkled paper, Versamark and Glassy Glaze.  

Here's my card:


Here's a close-up of the heart:


And hopefully you can see the shiny background a bit better here:
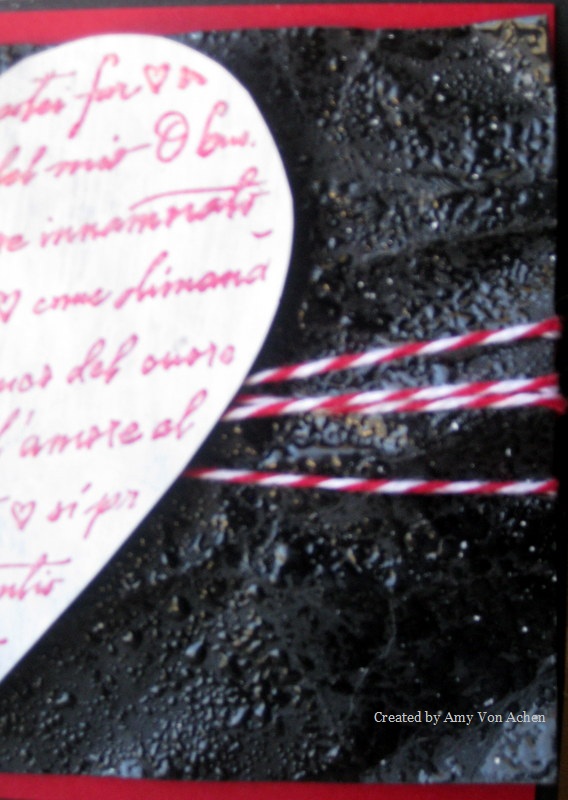

I started by applying gesso to a piece of patterned paper that was black with white hearts.  (I was hoping a bit of the pattern would show through, but I was a bit too heavy-handed with the gesso.)  I used a heat gun to dry the panel because I'm too impatient to watch paint dry!  I stamped my image over the gesso with Rose Red craft ink and heat embossed it with clear embossing powder, then cut around the image to create the heart shape.  Because the patterned paper is very light-weight, I cut a smaller-sized heart from chipboard (so it wouldn't be noticeable) and adhered it to the back of the stamped heart to give it some stability on the card.

Next I got to work on my shiny panel.  I spritzed a piece of black card stock with water, then crumpled it.  Once it was nicely crumpled, I flattened it out a bit and ran my heat gun over it to be sure all the water had dried.  I rubbed Versamark all over it using the direct-to-paper method, then applied Glassy Glaze, which is like a chunky, shiny embossing powder.  I heat set the Glassy Glaze to create a shiny, wet look that reminds me of raindrops. 

I wrapped red and white baker's twine around the black piece.  I adhered the black piece to a panel of red card stock, then adhered the red piece to a black card base that was cut to 4" x 5 1/2" (slightly smaller than an A2 card). I attached the heart to the shiny black panel using thick foam dimensionals and placed Zots on top of the dimensionals to really help the heart stick to the black panel.

I had so much fun playing with new tools for this card!  I have really enjoyed making different styles of valentines over the past couple of weeks, especially since I can use my favorite color combo (black, white and red) so easily at this time of year!  If you want to learn how to use new mediums and explore your creativity a bit, too, I hope you'll give the new Mix-Ability Challenge a try!  

Thanks for stopping by today!

Products Used:
Stamp: Amore HeartPrint (Hero Arts)
Ink: Rose Red Craft Ink (Stampin' Up!). Versamark (Tsukineko)
Paper: B&W Doodle Hearts (The Paper Studio); red and black card stock (unknown)
Tools and Accessories: Gesso (O'Leary Paint); clear embossing powder (Mrs. O'Leary's); Glassy Glaze (Stampin' Up!); baker's twine (Strands, Etc.); 3D Foam Squares and Zots (Therm-O-Web); chipboard


Wednesday, November 14, 2012

Embossed Snowflakes CASE

How can we be approaching the middle of November already?  What a month it has been!  My baby has gone from taking just a few steps at time to practically sprinting everywhere, keeping this mama running from one end of the house to the other all day.  While she's wearing me out, she's also wearing herself out, which means she's sleeping better and I can get a little more crafting time in at night.  So there is a silver lining!

Today's card is for the Featured Stamper challenge at Splitcoast Stampers.  For this challenge, we pick a card from that person's gallery to CASE (Copy and Share Everything).  We are asked to make at least two changes so the card is not an exact duplicate.  Here is a link to the card I chose to CASE:  Embossed Snowflakes

And here is my card:


While I kept the overall design and color scheme of the original card, I made a few changes.  I used a different snowflake embossing folder because I don't own the one she used.  Her embossing folder left a flat area for stamping in the bottom right-hand corner, but mine does not, so I stamped my sentiment on a label and attached it to the panel.  I sponged ink around my sentiment to add dimension to the label against the white background.  I didn't have the sentiment she used so I chose a different one, and instead of pearls in the centers of the snowflakes, I used White Enamel Accents. 

I started by dry embossing a piece of Whisper White card stock with an embossing folder in my Big Shot.  Next I stamped my sentiment on another piece of white card stock.  I didn't like the color I was getting with Night of Navy by itself, so I inked my stamp first with Cobalt and then with Night of Navy.  This achieved the deeper color I was looking for.  I cut out the sentiment with a labels die in my Big Shot, sponged around the edges with Night of Navy, then adhered the sentiment to the white panel.  I attached the white panel to the Night of Navy card base, then added White Enamel Accents on the snowflake centers, which I left to dry overnight.  This card was quick and easy to put together, and I love the colors for winter.  I could easily change the sentiment to something "not-Christmasy" for a winter card that could be used throughout the season.

Here's a tip for using an embossing folder in a die cut machine (such as the Big Shot): If my card stock isn't getting as deep of an impression as I'd like, I mist the card stock with a bit of water right before putting it in the embossing folder.  I will sometimes run the folder through my machine more than once, but I usually find the water mist does the trick with just one pass through the machine.

I have a few more cards in the works and hope to post another one tomorrow.  Thanks for stopping by!

Products Used:
 
Stamp: WordPlay - Joy (Stampin' Up!)
Paper: Whisper White and Night of Navy card stock (Stampin' Up!)
Ink: Ancient Page Dye Ink in Cobalt (Clearsnap); Night of Navy Classic Ink (Stampin' Up!)
Tools and Accessories: Big Shot (Sizzix); Snowflakes #9 embossing folder (Sizzix); Nestabilities Labels Eighteen (Spellbinders); White Enamel Accents (Inkssentials)

Monday, October 29, 2012

Coffee Break Friends

Happy Monday!  I hope you had an enjoyable weekend.  It was a busy and productive one at my house.  I always feel better about the upcoming week if I've managed to get a few things checked off my to-do list over the weekend.  It was also nice to just spend some time together as a family.  We ate lots of chili and carved a pumpkin and went to a Halloween party...the perfect way to spend a few chilly days in Autumn, if you ask me!

And while my family slept, I spent a few hours in my craft room to work on completing a few challenges.  The first card I made was for this week's CAS(E) This Sketch Challenge, which uses the following sketch:

 
I combined this sketch with the Operation Write Home Midweek Throwdown.  The current Midweek Throwdown challenge theme is "Celebrate Friendship", so I used both challenges to create this card:
 
 
This card combines two of my favorite themes: friendship and coffee! (Side note: I collect coffee stamps, so you'll see those quite often on my blog.  I also collect snowmen stamps, so I make a lot of winter cards!) 
 
Since this card will be donated to Operation Write Home, I wanted to keep the colors neutral enough that it could be sent or received by a man or a woman.  I made a card base from brown card stock and cut a panel of red card stock to run the length of the card. I stamped my coffee cup in Memento Espresso Truffle, then masked the cup to add the frothy milk. I applied Liquid Applique, then set the tag aside to dry. You're *supposed* to let the liquid applique dry overnight, but I never have that much patience!  After it seemed dry enough to me (an hour or two), I used my heat gun to make it puff up.  I love the texture it adds!  Because frothy milk isn't stark-white, I applied some metallic rub-ons with my fingers to change the color a bit.  Because I wanted the brown card stock to show through the vellum on my tag, I laid my tag on the back side of the red panel, traced around it and then cut out the area with my craft knife. I adhered the panel to my card base, then attached the tag to the card base using mini glue dots. I stamped my sentiment on white card stock in Memento Espresso Truffle and inked the edges of the white piece with the same color, then adhered it to the card. 
 
This old stamp set is just so much fun to use!  White Liquid Applique works perfectly for creating the frothy milk (which can also become a dollop of whipped cream for hot cocoa if you just change the sentiment). 
 
I noticed that in this photo, the red panel looks slightly skewed. It is perfectly straight on the card (I know this because I measured it...my darned astigmatism makes lining things up difficult so I rely on my trusty ruler!). I either need a better camera or I need to brush up on my photography skills!
 
Looking at this card today (when it's not the middle of the night!) I think I would like this a bit more if I had embossed the red panel to add a bit of texture.  I can definitely see several uses for the sketch and am looking forward to trying it with other images and sentiments.
 
I'll be back tomorrow to tackle another challenge or two.  I hope those of you who are hunkered down for Hurricane Sandy are staying safe and dry!  My thoughts and prayers are with all who are in the storm's path. 
 
Thanks for stopping by!
 
Products Used:
Ink: Memento Espresso Truffle (Tsukineko)
Stamps: Espress Yourself (Stampin' Up!)
Other: Liquid Applique (Marvy); Golden White Metallic Rub-On (Craf-T Products), heat tool, vellum tag


Thursday, October 25, 2012

Once Upon A Time

No matter how many color combinations I explore, I often gravitate back to a couple.  One combo I use often is black, white and red.  I just love this color combination!  So here it is again, this time on a card for a challenge at a brand-new blog, 'ABC' Challenges 

Since this is their first challenge, they required us to use something new on our cards, whether it be something we actually purchased new or something that we just haven't used before.  Since I'm working on love-themed cards for Operation Write Home, I thought this would be the perfect time to try out a new die I purchased.  I bought it (along with several others) at a scrapbooking sale where crafters sell off supplies they are no longer using.  I came home with several dies this year, which was really exciting!  (I love getting a good deal almost as much as I love making cards!)  So the heart die cut on this card is my "new" for this challenge.  This ribbon might be a "new" also, because I don't recall ever using it before.  It was in my stash and who knows how long it's been there?!

Here's my card:


I really love this sentiment and the set that it comes from.  The stamp is definitely not new to me, as it's one of the stamps I used for my wedding.  This one always brings a smile to my face when I use it.

I started by stamping my background in craft ink on white card stock, then heat embossing it with clear embossing powder.  I wrapped my ribbon around the white panel, die cut my heart, stamped my sentiment and added some rhinestones to the heart.  I adhered the heart to the panel with dimensionals, then adhered the panel to a black card base.  I think this card would be appropriate as a general "I love you" card or as Valentine's Day card.

Here's a tip about dimensionals: For this card I used Stampin' Dimensionals (Stampin' Up!) to adhere the heart to the panel.  I love these dimensionals because they are only 1/16" thick.  I have purchased several other brands and many of those are 1/8" thick, which I feel is often too thick.  If you buy 1/16" thick dimensionals, you can always stack them to make them thicker if you want a different effect.  Stampin' Up! is not the only company who offers dimensionals in 1/16" thickness, so if you're shopping for another brand, just check the labels carefully.  You can also find tape that offers a dimensional effect, but again, check the thickness.  It's not such a big deal in cards that I'm hand-delivering, but when they go through the mail, that little bit of extra thickness is not always desireable. 

My craft room table is a bit of a disaster this week, so I'm planning to do some reorganizing before I do any more stamping.  I hope to have another card to post for you in the next couple of days.

Thanks for stopping by!

Products Used:

Background Stamp: Tres Chic (Stampin' Up!)
Background Ink: Craft Black (Stampin' Up!)
Sentiment Stamp: Fairy-Tale Wedding (Stampin' Up!)
Sentiment Ink: Memento Tuxedo Black (Tsukineko)
Die: Hearts, Tipsy (Sizzix)
Tools: Big Shot (Sizzix); Mrs. O'Leary's Clear Embossing Powder; rhinestones;
ribbon; Stampin' Dimensionals (Stampin' Up!)


Monday, October 22, 2012

To the Moon and Back

Today's card just tugs a bit at my heartstrings, so I hope you don't mind if I share the story behind this one.  I bought the stamp I used on this card because the sentiment means so much to me.  If you ask my son how much his mommy loves him, he'll answer, "To the moon and back!"  (I must pause here to announce that I have amazing children.  Sure, I'm biased, but it's still true!) 

So when I found this stamp recently, I knew it would be well-loved at my house.  And when I saw this week's challenge at CAS(E) This Sketch (check them out HERE), I decided it was the perfect time to pull out this stamp and start creating.  I have a feeling you'll be seeing more cards with this stamp in the future.  It's just such a great sentiment!

Here's the sketch I was working with:


And here is my card:


It's really hard to see in this picture (darned overcast day!), but the sentiment panel and the moon are shaded with peach, yellow and blue tones to give them some dimension and keep them from being stark white.  I used die cuts in my Big Shot for most of this card.  The moon is a circle die cut, the sentiment is a Nestabilities die cut, and the stars are die-cut from shimmery silver paper.  I stamped my sentiment, then sponged dye ink and chalks on my sentiment panel and the moon.  I adhered everything to a dark blue card base (it's lightly textured, which also doesn't show up well in the picture).  This will be an easy card to recreate, so I plan to make a few more to donate to Operation Write Home.  I am sure there are some deployed mommies and daddies who would love to send cards home to their kids!

I am working on another challenge card today and will be posting that one tomorrow.  Thanks for stopping by today!

Products Used:
 
Stamp - Unity
Paper - Various sources
Ink - Night of Navy Classic Ink (Stampin' Up!)
Tools: Big Shot; Sizzix Circles #2; Spellbinders Nestabilities Labels Eighteen;
Provo Craft die for stars; Stampin' Up! chalks; various dye inks