I'm Amy, a stay-at-home mom by day and a crafter by night. After a day of chasing my kids around the house, I escape to my craft room for a few hours of creating while they sleep. Thanks for joining me in my little corner of the crafting world!

Thursday, January 17, 2013

Fussy-Cut Flowers for Martha

Happy Thursday!  I mentioned in an earlier post that one of my creative goals for 2013 is to try new techniques.  One of my other creative goals is to use more patterned paper.  Matching patterns and colors doesn't come easily to me, so I've found that paper packs and matstacks are helpful because they coordinate well with each other.  I used a matstack for today's card and it definitely took away some of the frustration of choosing papers!  I also used fussy-cutting to create dimension with the pattern, which is another technique that is new to me.

I created this card for this week's Teapot Tuesday challenge at Splitcoast Stampers.  This week our cards are heading to Texas for a sweet lady named Martha.  Shortly after Thanksgiving, Martha and her husband decided to take a short,  impromptu trip to New York with another couple.  While they were there, Martha's husband said he didn't feel well.  Moments later he died of a massive heart attack.  Martha enjoys handmade cards, so the Teapotters will be showering her with our best thoughts and wishes as we mail our cards to her.  We were encouraged to use fields of flowers or other peaceful nature scenes for our cards.

Here's my card for Martha:


This card has very little stamping; only the sentiment is stamped.  I started with a card base in natural white (a lovely off-white color).  I stamped my sentiment in Rich Cocoa on a smaller piece of natural white, then attached it to brown and green patterned papers from the Latte matstack collection.  I cut a large panel from the flowery patterned paper in the same collection, then used a second piece of the patterned paper to fussy-cut some of the flowers.  I popped those flowers  up on dimensionals and adhered them over the identical flowers on the larger panel.  

I didn't have the color of ribbon I wanted to use, so I grabbed some off-white ribbon and my New Sprout ink pad.  I dyed the ribbon by running the ink pad over it several times, then rubbing off the excess ink with an old cloth.  I adhered the ribbon to the patterned paper, then adhered the entire panel to the card base. Finally, I added my sentiment block over the ribbon with dimensionals.

It's hard to see the "popped-up" flowers in the first photo, so here's a slightly different view:


If you're inclined to make cards to send to others who could use a bit of sunshine, I hope you'll consider joining us for the next Teapot Tuesday challenge.  Everyone is welcome!

Thanks for stopping by today!

Products Used:
Stamp: Close as a Memory (Stampin' Up!)
Ink: Memento Rich Cocoa, Memento New Sprout (Tsukineko)
Paper: Classic Crest Natural White 80 lb. card stock (Neenah), Latte matstack (DCWV)
Tools and Accessories: Ribbon (Offray); Stampin' Dimensionals (Stampin' Up!)

Wednesday, January 16, 2013

Seamless Tiers with Patterned Paper Experiment

Happy Wednesday! I'm in the midst of reorganizing my craft room and several other rooms in my house, so I haven't had much stamping time over the past several days.  I have a few cards I need to send out this week, so I took a break from reorganizing and managed a little bit of crafting time after my kids went to sleep last night.

Over in the general stamping forum at Splitcoast Stampers, we've been having a discussion about the best way to use the Seamless Tiers/Triple Time technique using patterned paper instead of stamped images.  I think the easiest way is to use nested rectangle dies, but since I don't have those, I thought I'd try just cutting the layers myself.  This did not work out as well as I'd hoped, but it was a fun experiment!  The top two layers are lined up correctly, but I didn't manage to get the bottom layer to match up with the middle layer.  I don't mind, though, because I know the recipient of the card will not be critiquing it.  It's easy to forget sometimes, in our quest for perfection, that the recipient is usually just thrilled to get a card that was lovingly (if not perfectly) created.  I am going to try this technique again to see if I can manage it without the dies, but I think the dies would sure make this easier!

Here's my card:

I have to apologize for the poor picture quality.  I use natural lighting through a window, and the winter is really making it difficult to find the right time of day to photograph cards.  The colors on this card are Night of Navy and white, although the navy color looks black here.  Also, the shadows and angle make the sentiment panel look off-center, but I measured it and it's centered pretty well.  Darn photo!

This card uses almost exactly the same measurements as the ones in this post, but this time I used patterned paper in place of stamped images.  Before adhering the final layers, I wrapped a band of white card stock behind the sentiment panels, then popped up the sentiment panels using Stampin' Dimensionals.  This is a very simple card, and if I had just gotten that pattern lined up better I would have been happy to have made an easy AND pretty card!  But it's given me a jumping-off point and I'm sure I'll make another card like this soon so I can figure out how to fix those layers.

This card will be mailed to a sweet lady with leukemia who just had a bone marrow transplant.  She has to spend 100 days in a hotel away from her family and friends to avoid germs and be near the hospital.  Can you imagine spending 100 days away from those you love?  The thought breaks my heart, so I hope this card will encourage her. 

I hope you have a wonderful day!  Thanks for stopping by!

Products Used:

Stamp: Scripture Series 3 (Our Daily Bread Designs)

Paper: Night of Navy card stock (Stampin' Up!); Classic Crest Solar White 110 lb. card stock (Neenah)
Ink: Night of Navy Classic Ink (Stampin' Up!)


Thursday, January 10, 2013

Watercolored Poppies for Sherry

Happy Thursday!  I looked out my window this morning to see that God has blessed us with rain.  We've been in a drought for quite awhile now, so rain is most welcome where I live!  (Since I use natural light for photographing my cards and today was quite a dreary day, I hope you'll forgive the poor photo quality on this post.)

I'm running behind on my Teapot Tuesday challenge at Splitcoast Stampers this week, but I finally finished my card last night.  This week's recipient is a lovely lady whose husband died last year and she needs some cheering up.  We were asked to make "thinking of you" cards with flowers, and perhaps a butterfly or two.  After I went to bed last night I realized I forgot the butterflies!  So I will add a couple to the inside liner of my card before mailing it to her.  I am also submitting this card for the current Addicted to Stamps and More Challenge, where the theme this week is "nature".  In the midst of winter, it was nice to take a break and make a flower card!

Here's my card: 


While I usually make A2 sized cards (4.25" x 5.5"), this time I wanted to make something a little different.  This card is 3" x 5 3/8", a rather odd size, but I liked the way it worked for my design.  Sometimes you just have to mix things up a bit!

I started by stamping my image and sentiment in StazOn Timber Brown on watercolor paper, then I watercolored my image.  I attached the stamped panel to a piece of brown card stock and trimmed to fit.  I made a card base from some lightly textured dark green card stock and cut a smaller piece of the same card stock to put in the middle section of my stamped panel.  I embossed the smaller green piece using the Square Lattice embossing folder, then adhered it to my watercolored panel.  I wrapped jute around the center section and secured it with a decorative brad.  (The brad is a bit bulky and heavy so I also used a mini glue dot to hold it in place.)  I attached the panel to my card base and added a liner to the inside for writing.       

It's been a busy week at my house, and I'm so glad we've almost made it to Friday!  I hope you have a wonderful day.  Thanks for stopping by!


Products Used:
Ink: Timber Brown (StazOn)
Stamps: Poppies (Penny Black); Sincere Salutations (Stampin' Up!)
Paper: Watercolor paper (Strathmore); dark green card stock, dark brown card stock (unknown)
Tools and Accessories: Watercolor crayons (Staedtler); watercolor pencils (Prismacolor);
Square Lattice embossing folder (Stampin' Up!); brad (Recollections); jute (unknown)

Tuesday, January 8, 2013

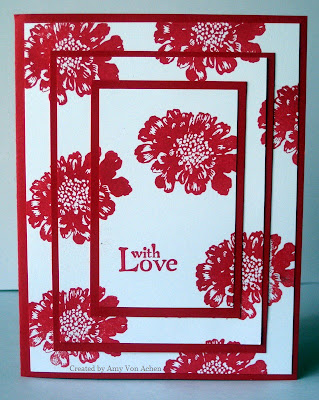
Triple Time/Seamless Tiers Love Card

Happy Tuesday!  It's a beautiful day here and I'm feeling a bit spoiled by the brilliant sunshine and mild temperatures.  This weather is really unusual for us at this time of year.  What a blessing!

I rarely make New Year's resolutions, but this year I decided to focus my resolutions on the "creative" part of my life.  One of my resolutions is to try new techniques and projects this year.  I have developed a bad habit of seeing techniques I want to try and "pinning" them but never actually trying them.  So I'm going through my Pinterest boards and my gallery favorites at Splitcoast Stampers and pushing myself to try new things.  Here's to breaking out of my comfort zone in 2013!

This week's Try a New Technique challenge at Splitcoast Stampers gave us the opportunity to try one of the many challenge techniques from 2012, so I chose to try Triple Time Stamping (also called Seamless Tiers) for my card.  I have seen so many magnificent cards using this technique, but it involves a bit of measuring and I'm more of an eyeballer than a measurer.  Thankfully, many wonderful bloggers are willing to share their recipes and measurements and they've taken all the hard work out of this technique!

Here's my card:

And here's a link to the tutorial I followed at Jan's Stamping Creations.

There are many wonderful tutorials online and some of them include videos, so you can certainly find many options for this beautiful technique.  I've seen lots of different measurements for the layers and I may try other combinations in the future.  You could easily cut the pieces for several cards at once and then construct them as you have time, or make several of the same card assembly-line style.  I was truly surprised at how quickly this card was completed. 

Thanks for stopping by today.  I hope you have a wonderful day!


Products Used:
Ink: Real Red Classic Ink (Stampin' Up!)
Paper: Real Red, Whisper White card stock (Stampin' Up!)
Stamps: Field Flowers (Stampin' Up!)

Friday, January 4, 2013

Chalkboard Technique with Rick Rack

Happy Friday!  Today's card was a bit of an experiment.  One of my creative goals in 2013 is to try lots of new techniques (not just pin them on my Pinterest boards!), and this week's Try a New Technique challenge at Splitcoast Stampers intrigued me.  For this challenge, we were asked to use the chalkboard technique.  I also wanted to play along with this week's Ways to Use It challenge (also at Splitcoast Stampers) which asked us to use things that are new to us, so I designed a background using some new rick rack I picked up while Christmas shopping.  I like the wavy effect of the rick rack against the solid panels of the sentiment:  


To make the chalkboard panel, I ran my Embossing Buddy over a piece of black card stock, then stamped my sentiment in white craft ink.  I added white embossing powder and heat embossed the sentiment.  I set it aside to dry for a few moments, then sponged white craft ink on the panel to create the effect of chalk dust.  Since craft ink is slow-drying, I set the stamped panel aside and started working on my background.  I ran my rick rack through my Xyron Create-A-Sticker to get a good line of adhesive on it, then attached it in rows to a black card base.  I attached my sentiment panel to a piece of white card stock and trimmed it to fit, then attached it with Stampin' Dimensionals to the card base.  To add just a bit of color, I punched two hearts from a piece of shimmery hot pink card stock and added them to the sentiment panel.

I really had fun with this technique and plan to try it again soon.  I love that it uses ink in place of chalk (no chalk dust!) and looks quite realistic in person.  This stamp is one of my new favorites with its lovely message (you may remember it from this post).  If you want to see more cards using the chalkboard technique, I have a few pinned to my "cards" board on Pinterest.  Feel free to follow me and see more examples of this fun technique!

Thanks for stopping by today! 

Products Used:

Paper: Whisper White card stock (Stampin' Up!); black card stock from stash;
shimmery hot pink card stock from stash
Stamp: 7 Gypsies/Hampton Art
Ink: Craft White (Stampin' Up!)
Tools and Accessories: Baby Rick Rack (Wright's); white embossing powder (Stampin' Up!);
heart punch (Marvy Uchida); Stampin' Dimensionals (Stampin' Up!)


Wednesday, January 2, 2013

Twins and Teapotters

Happy New Year!  I was lucky enough to kick off 2013 with some gorgeous snow which really put me in a festive mood.  It made for a beautiful start to the New Year!

Today's card is a Teapotter's Challenge card at Splitcoast Stampers.  This week our cards are celebrating the birth of fraternal twins born to a sweet couple, Andrea and Erik.  They've been married for 19 years and have suffered through miscarriages until finally, at the age of 44, Andrea gave birth to twins.  Yay!!  Every time I hear a story like this, it makes me smile all the way from my heart.  I know quite personally how hard it is to go through a pregnancy after miscarriages, and I know the amazing joy of bringing a child safely into the world after months of waiting and worrying.  So I am thrilled to send this card to Erik and Andrea with my very best thoughts and wishes:

 
I just love this image of a mother cradling her child.  I used this image and sentiment on the cards I sent out to family and friends after my daughter was born.  The sentiment is a Christmas one (I'm sure you recognize it as a movie title), but I think it fits perfectly.  My daughter's birthday is in December (and Andrea's twins were born in December), so the sentiment suits the season well.  I feel such deep and utter contentment when holding my children and I know that really, truly, my life is wonderful and amazing and blessed, and this stamp really puts my feelings into words.  Since these babies are boy and girl twins I had to include some pink and blue on my card, which I used in the background.  I kept the baby's blanket a neutral yellow so it could symbolize either baby in her arms.  I wanted the focus to be on the image and sentiment so I kept this card free of embellishments. It is a simple card, but I hope it conveys my heartfelt joy at the birth of these beautiful, much-anticipated babies.

I started by stamping my image and sentiment on Solar White 110 lb. card stock, then used watercolor crayons and brushes lightly dipped in water to color the image.  I inked the edges of the stamped panel with Rich Cocoa and set it aside.  I used the direct-to-paper method to add blue and pink ink to another panel of Solar White card stock and adhered the stamped panel to the inked one.  I attached pink and blue patterned papers to a Solar White card base, then added a satiny white ribbon to cover the seam.  I attached the stamped piece to the card base to complete the front of the card.  I also stamped a sentiment on the inside which reads, "It's the smallest things that fill your heart."

I never get tired of making baby cards!  Since I took a short break from stamping over the holidays, this challenge gave me a happy excuse to get inky again.  Thanks for stopping by today.  I hope you have a Happy New Year!

Products Used:

Stamps: Sketches (Stampin' Up!); sentiment from Hampton Art
Stamp on Inside Panel: Smallest Things (Stampabilities)
Paper: Classic Crest Solar White 110 lb. card stock (Neenah); Clouds (Paper Pizzazz);
Baby Girl Elephant (Reminisce)
Ink: Memento Rich Cocoa, Summer Sky and Angel Pink (Tsukineko)
Tools and Accessories: Watercolor crayons (Staedtler); ribbon (Offray)


Monday, December 31, 2012

Goodbye 2012, Hello 2013!

Happy New Year's Eve!  I've been so busy with family over the holidays that I haven't spent much time in my craft room or blogging, but I plan to post some new cards later this week.  In the meantime, I wanted to take a moment to thank each of you for visiting my blog in 2012.  Your kind comments have meant so much to me, and I hope you'll continue to visit me here in 2013.  I have met so many wonderful people through the blogging world, and I continue to be inspired every day as I visit your blogs and online galleries to see your marvelous creations.  Here's to a happy and crafty 2013 for all of us!

Thanks for stopping by today.  Happy New Year!