I'm Amy, a stay-at-home mom by day and a crafter by night. After a day of chasing my kids around the house, I escape to my craft room for a few hours of creating while they sleep. Thanks for joining me in my little corner of the crafting world!
Showing posts with label Valentine's Day. Show all posts

Thursday, February 14, 2013

Valentine's Day Card for My Husband

Happy Valentine's Day!  I hope you're having a fun, relaxing day with the ones you love.  This is just a quick post to show you the Valentine's Day card I made for my husband:


I wanted something masculine but still romantic, so I avoided hearts and lace and stuck with basic ribbon and brads.  I "roughed up" the pretty paper with some distressing, so hopefully this is manly enough for my big bear of a husband (who's really more "teddy bear" than "growly bear", but don't tell him I shared that secret!).  I waited to post this until after I gave it to him, thinking it would be a surprise.  He opened it and said, "I figured this one was for me."  That's when I realized it had been sitting in plain sight after I took pictures for the blog.  Oops!  But at least I know he pays attention to what I'm crafting!

I started with a natural white (almost ivory) card stock base.  Then I used two-sided paper from Authentique: one side I stamped on for the card front, and the other side is the dotted panel, which I heavily distressed to darken the dots and mute the red a bit.  For the larger piece, I used a script stamp and Walnut Stain Distress Ink.  To get the softer effect, I stamped off first on a piece of scrap paper, then stamped on my card piece.  I used a Nestabilities die to cut my scalloped piece.  I stamped my sentiment in Rich Cocoa on another piece of natural white, then added more distressing with Tea Dye and Walnut Stain Distress Inks.  I attached the sentiment piece to the scalloped piece and added the brads.  I wrapped a piece of brown ribbon around the dotted piece, then adhered the scalloped piece over the ribbon using foam dimensionals.

Thanks for taking the time to visit me on Valentine's Day! 


Products Used:
Stamps: Old Letter Writing (Hero Arts); Be My Valentine (Hambo Stamps)
Paper: Authentique Collection: Lovely (used "Greetings" and "Crush" 2-sided paper); Classic Natural White 80 lb. card stock (Neenah)
Ink: Tea Dye and Walnut Stain Distress Inks (Tim Holtz/Ranger); Memento Rich Cocoa (Tsukineko)
Tools and Accessories: Nestabilities Classic Scalloped Rectangles Small (Spellbinders); ribbon (Celebrate It Basic-Basic); brads (Recollections); dimensional  tape (Scotch)


Wednesday, February 13, 2013

Valentine's Day Treats

Happy Wednesday!  Valentine's Day is almost here, which makes me a little sad because I love Valentine's Day crafting.  My son needed valentines for his classmates this week and I found a fantastic tutorial for adorable treat holders, so I just had to make some fun little packages for his class.  A friend recently lamented that her child's school doesn't allow candy at their Valentine's Day class parties.  Oh, the horrors!  As a dedicated chocoholic, I cannot imagine this holiday without candy.  Thank goodness my son's school isn't so strict!!

Here's what I made:

The kids are asked to give signed but unaddressed valentines.  
I substituted my name for my son's name just for these pictures. 

Here's a side view, so you can see how they stand:


(I have to apologize for the quality of the pictures.  I finished them late at night and sent them to school with my son in the morning, so I had to photograph them without natural light.  Nothing like last-minute crafting!)

These treat holders come together very quickly and Angie's tutorial is really easy to follow.  The tutorial shows how to make a Halloween treat package, but as you can see it can easily be adapted to other holidays.  Here's the tutorial and video I followed, which includes measurements and assembly instructions: Chic' n Scratch. (While you're there, check out some of Angie's other tutorials.  She has over 400 of them!)

If you use an 8.5 x 11 piece of card stock for the base you can make three packages from one piece of card stock.  I also had some 12 x 12 card stock that I wanted to use, so I was able to get more packages from a piece that size.  I made 12 packages for my son's class and only needed one piece of 12 x 12 patterned paper (I only used the patterned paper on the front side of each package).  I filled them with the snack size bags of candy, which cost me less than 20 cents each.  I decorated mine by making a bow from baker's twine and attaching it with a mini glue dot to the tag, then attaching the tag to the package with dimensional foam tape (all things that I had in my stash of supplies).  This is a very cost-effective project!

I chose to staple the candy to the package to keep it in place, but forgot to staple it before adhering the patterned paper.  Quick fix: I adhered the tag over the staple.  Easy peasy!

I hope you're enjoying your Valentine's Day crafting!  Tomorrow I will post one final Valentine's Day card, so I hope you'll visit me again.  Thanks for stopping by!


Products Used:
Stamp: deadbeat DESIGNS
Paper: Red card stock (Bazzill); Classic Crest Solar White 110 lb. card stock (Neenah); 
Candy Pile (EK Success, Ltd.) 
Ink: Real Red Classic Ink (Stampin' Up!); Pure Black Writer (Zig)
Tools and Accessories: Small and Large Tag Punches (Stampin' Up!); baker's twine (Strands Etc.); 
mini glue dots; foam tape


Tuesday, February 5, 2013

Mixed Media Valentine

Happy Tuesday!  After a few days away from crafting while I nursed a migraine (oh, those evil weather changes) and rushed my way through a busy weekend, I finally had a chance to play in a brand-new challenge at Splitcoast Stampers, the Mix-Ability Challenge.  This one is so much fun!  It challenges us to use mixed media in projects, but even better, it teaches us how to use mixed media in projects.  Lydia even created a fantastic video for the challenge, which you can see HERE.

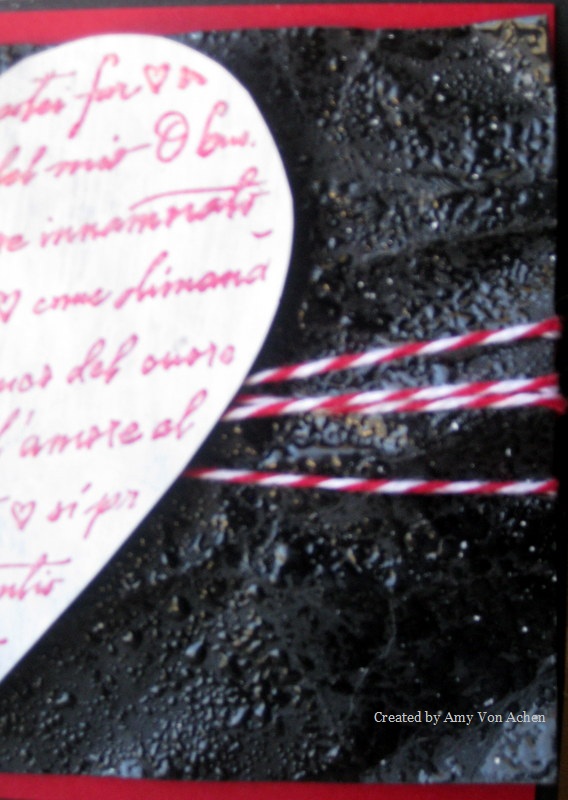
This week's challenge is "Yin Yang".  We're asked to use something matte and something shiny on our cards.  Since Lydia's video showed how to use gesso and I've been wanting to try gesso on a card, I used that medium to create a matte background for my heart.  I have two "shiny" things on my card, one subtle and one not-so-subtle.  I used heat embossing on my heart and I created a "raindrop" background using crinkled paper, Versamark and Glassy Glaze.  

Here's my card:


Here's a close-up of the heart:


And hopefully you can see the shiny background a bit better here:


I started by applying gesso to a piece of patterned paper that was black with white hearts.  (I was hoping a bit of the pattern would show through, but I was a bit too heavy-handed with the gesso.)  I used a heat gun to dry the panel because I'm too impatient to watch paint dry!  I stamped my image over the gesso with Rose Red craft ink and heat embossed it with clear embossing powder, then cut around the image to create the heart shape.  Because the patterned paper is very light-weight, I cut a smaller-sized heart from chipboard (so it wouldn't be noticeable) and adhered it to the back of the stamped heart to give it some stability on the card.

Next I got to work on my shiny panel.  I spritzed a piece of black card stock with water, then crumpled it.  Once it was nicely crumpled, I flattened it out a bit and ran my heat gun over it to be sure all the water had dried.  I rubbed Versamark all over it using the direct-to-paper method, then applied Glassy Glaze, which is like a chunky, shiny embossing powder.  I heat set the Glassy Glaze to create a shiny, wet look that reminds me of raindrops. 

I wrapped red and white baker's twine around the black piece.  I adhered the black piece to a panel of red card stock, then adhered the red piece to a black card base that was cut to 4" x 5 1/2" (slightly smaller than an A2 card). I attached the heart to the shiny black panel using thick foam dimensionals and placed Zots on top of the dimensionals to really help the heart stick to the black panel.

I had so much fun playing with new tools for this card!  I have really enjoyed making different styles of valentines over the past couple of weeks, especially since I can use my favorite color combo (black, white and red) so easily at this time of year!  If you want to learn how to use new mediums and explore your creativity a bit, too, I hope you'll give the new Mix-Ability Challenge a try!  

Thanks for stopping by today!

Products Used:
Stamp: Amore HeartPrint (Hero Arts)
Ink: Rose Red Craft Ink (Stampin' Up!). Versamark (Tsukineko)
Paper: B&W Doodle Hearts (The Paper Studio); red and black card stock (unknown)
Tools and Accessories: Gesso (O'Leary Paint); clear embossing powder (Mrs. O'Leary's); Glassy Glaze (Stampin' Up!); baker's twine (Strands, Etc.); 3D Foam Squares and Zots (Therm-O-Web); chipboard


Thursday, January 24, 2013

Valentine for a Friend

Happy Thursday!  It's another dark and dreary (and oh, sooooo cold) day here, but I'm so excited that the weekend is in sight!

I created today's card for a couple of different challenges.  I used the sketch from this week's Card Sketch challenge at Splitcoast Stampers.  I am also entering the color challenge at Dynamic Duos:


The "dessert" option on the color challenge is to make a Valentine, but since I am sending this card to a friend I didn't want to use the traditional hearts and lovey-dovey sentiments.  I left the hearts and flowers behind and headed straight for the chocolate!

This card turned out very differently than I'd planned.  I ended up adding more and more and more layers until the card was so heavy I had to add a heavyweight card stock liner to balance it!  Have you ever heard the children's song, "This is the Song That Never Ends"?  As I created this card, I kept thinking, "This is the card that never ends!"  But I just kept adding layer after layer after layer.  I'll be honest, the creative process got a bit out of control last night!  

Here's my card:


(Isn't that candy image fun?  I went to my mailbox one day, expecting only bills, and was surprised to find a package with this stamp and two other chocolate-themed stamps.  A very sweet family member saw them and thought of me, so she bought them and sent them in the mail as a surprise.  Isn't that the best kind of surprise?  So very "sweet" in more ways than one!)

This is a square card, 5"x5", which I don't often make.  They require square envelopes and additional postage, so I usually reserve this size for cards I'm hand-delivering.  I started by stamping my candy images on Whisper White card stock using Real Red ink, then die cut them.  I used a deckled square punch to cut four squares from Real Red card stock.  I stamped the sentiment in black craft ink, added clear embossing powder and heat embossed it.  Then I started cutting layers (and layers, and layers!) of Real Red, Whisper White and Basic Black card stock and adhered them to the base.  I attached the images and sentiment (using dimensionals behind the sentiment), then covered the candy images with Glossy Accents to get the shiny look of the "real thing".  I added my heavyweight (balancing) inner liner and stamped it with the same candy images in the corners.  Then I searched my house high and low for some of that delicious chocolate candy, and doggone it, there was none to be found!  

I love hearts and flowers and all the romantic stuff of Valentine's Day, but I have come to realize the value of my friendships with women.  This year as I'm celebrating Valentine's Day with my husband and children, I will also be thinking of all those wonderful women who've helped me get to this place of contentment in my life. Good friends are such wonderful blessings!

Thanks so much for stopping by today!  


Products Used:
Paper: Real Red, Basic Black, Whisper White card stock (Stampin' Up!); 
Neenah Classic Crest Solar White 110 lb. card stock (for inner liner, not pictured)
Ink: Real Red Classic Ink, Basic Black Craft Ink (Stampin' Up!)
Stamps: Deadbeat Designs (candy image); Hambo Stamps (sentiment)
Tools and Accessories: Nestabilities Standard Circles Large (Spellbinders); 1 1/4" deckle punch (McGill); 
clear embossing powder (Mrs. O'Leary's); Glossy Accents (Ranger); Stampin' Dimensionals (Stampin' Up!)


Tuesday, January 22, 2013

Vintage Valentine

Happy Tuesday!  It's bright and sunny but very cold here today.  We were blessed with beautiful weather on Saturday (no jackets! short sleeves!) but today we're back to bundling up in coats and hats.  

Over the weekend I stopped in at my local scrapbooking and stamping store.  Sometimes I drop in just to get inspiration, sometimes to pick up something I need and sometimes just to relax and enjoy a little kid-free quiet time.  The owner is very knowledgeable and friendly, and this weekend she pointed me toward some of the cutest 12x12, two-sided Valentine-style paper I've ever seen!  As soon as I saw it, I knew I would be making vintage Valentine's Day cards with it.  Vintage usually isn't my style, but this paper just begs to be distressed!

This week's Clean and Simple (CAS) challenge at Splitcoast Stampers is a sketch challenge (view the challenge sketch HERE to play along).   I chose to flip the sketch on its side and use one of the images from this delightful patterned paper in place of stamping  The challenge with CAS is to use very minimal stamping, images and embellishments while still making a beautiful card, and I've found vintage CAS to be even harder.  I had to restrain myself to keep from adding elements to this card!


(I apologize for the poor picture quality.  I use natural light so I really need to photograph at just the right time of day to get a good picture, but I was running behind and missed the best light.)

I started by cutting the image and distressing it. Next I cut a mat from the reverse side of the paper, distressed it and adhered the image to the mat.  I die cut a border from natural white card stock and distressed that, too.  I attached the border to the larger panel and added three brads, then attached the entire piece to a dark brown card stock base, which was cut slightly smaller than A2 size for a better fit.  

There are several other Valentine images on the 12x12 patterned paper and I can't wait to make cards using the other images.  I liked this paper so much that I hurried back to the store to buy a few more sheets before it's sold out!

Thanks for stopping by today.  I hope you stay warm and cozy!


Products Used:
Paper: Collection: Lovely "Greetings" Two-Sided Paper (Authentique); 
Classic Crest Natural White 80 lb. card stock (Neenah); dark brown card stock (unknown)
Ink: Walnut Stain Distress Ink (Tim Holtz/Ranger) 
Tools and Accessories: Borderabilities Jumbo Scalloped Petite Borders (Spellbinders); brads (Recollections)


Monday, January 21, 2013

Cork and Chalkboard Valentine

Happy Monday!  I spent part of the weekend working on the reorganization project in my craft room, but I managed to carve out a little time late last night to put together a card for a couple of challenges at Splitcoast Stampers.  The Ways to Use It challenge asked us to use cork on a card.  I have a big roll of cork but I never think to use it on my cards, so this was a fun challenge.  

The other challenge I tried is a new one to me, the Fan Club Central Theme challenge.  This month's theme is "dirty laundry", and let me tell you, this one hits close to home for me!  The only way to access my craft room is through the laundry room, so I have to walk past Mount St. Laundry whenever I want to make a card!  One of the options was to make a card using color combinations from the clothes in our laundry baskets.  I surveyed my laundry and noticed a lot of black and red, so I decided to use those colors for this card (and white, in honor of the big pile of towels my kids used for their baths!).  

I also have a "dirty little secret" (another challenge option): I used a little piece of plain old Scotch tape to clean up the extra bits of embossing powder that stuck to my black card stock before I heat embossed it.  I've found it pulls away the excess powder much cleaner than the brush I usually use.  I also used Scotch tape to hold the twine in place on the back of my red panel.  That stuff is handy!

Here's my card:


I started by die cutting the cork to make a frame, then set it aside to make my chalkboard (to see more about the chalkboard technique, please see this post).  I stamped my image and sentiment in white craft ink on black card stock, then heat embossed them using white embossing powder.  I sponged white craft ink over the panel and rubbed it with a towel to create the look of eraser marks.  I adhered the black panel to the cork frame, then attached the framed piece to a panel of Real Red card stock.  I wrapped red and white baker's twine around the red panel and secured it with Zots and a decorative white button.  Finally, I attached the red panel to a heavy white card base.  

I'm really excited by this month's Fan Club challenges ("laundry" is normally a dirty word at my house, no pun intended!) and look forward to trying other options in the challenges.

Thanks for stopping by today!

Products Used:

Ink: Craft White (Stampin' Up!)
Stamps: Heart (Stampabilities); Be My Valentine (Hambo Stamps)
Paper: Classic Crest Solar White 110 lb. card stock (Neenah); 
Real Red card stock (Stampin' Up!);  black card stock (unknown)
Tools and Accessories: Stampin' Emboss Powder White (Stampin' Up!); frame die (Sizzix);
Zots (Therm-O-Web); baker's twine (purchased from Strands Etcetera on Etsy); cork; button

Friday, January 4, 2013

Chalkboard Technique with Rick Rack

Happy Friday!  Today's card was a bit of an experiment.  One of my creative goals in 2013 is to try lots of new techniques (not just pin them on my Pinterest boards!), and this week's Try a New Technique challenge at Splitcoast Stampers intrigued me.  For this challenge, we were asked to use the chalkboard technique.  I also wanted to play along with this week's Ways to Use It challenge (also at Splitcoast Stampers) which asked us to use things that are new to us, so I designed a background using some new rick rack I picked up while Christmas shopping.  I like the wavy effect of the rick rack against the solid panels of the sentiment:  


To make the chalkboard panel, I ran my Embossing Buddy over a piece of black card stock, then stamped my sentiment in white craft ink.  I added white embossing powder and heat embossed the sentiment.  I set it aside to dry for a few moments, then sponged white craft ink on the panel to create the effect of chalk dust.  Since craft ink is slow-drying, I set the stamped panel aside and started working on my background.  I ran my rick rack through my Xyron Create-A-Sticker to get a good line of adhesive on it, then attached it in rows to a black card base.  I attached my sentiment panel to a piece of white card stock and trimmed it to fit, then attached it with Stampin' Dimensionals to the card base.  To add just a bit of color, I punched two hearts from a piece of shimmery hot pink card stock and added them to the sentiment panel.

I really had fun with this technique and plan to try it again soon.  I love that it uses ink in place of chalk (no chalk dust!) and looks quite realistic in person.  This stamp is one of my new favorites with its lovely message (you may remember it from this post).  If you want to see more cards using the chalkboard technique, I have a few pinned to my "cards" board on Pinterest.  Feel free to follow me and see more examples of this fun technique!

Thanks for stopping by today! 

Products Used:

Paper: Whisper White card stock (Stampin' Up!); black card stock from stash;
shimmery hot pink card stock from stash
Stamp: 7 Gypsies/Hampton Art
Ink: Craft White (Stampin' Up!)
Tools and Accessories: Baby Rick Rack (Wright's); white embossing powder (Stampin' Up!);
heart punch (Marvy Uchida); Stampin' Dimensionals (Stampin' Up!)