I'm Amy, a stay-at-home mom by day and a crafter by night. After a day of chasing my kids around the house, I escape to my craft room for a few hours of creating while they sleep. Thanks for joining me in my little corner of the crafting world!
Showing posts with label heat embossing. Show all posts

Tuesday, February 19, 2013

Roses for Denise (Teapot Tuesday)

It's time for another Teapot Tuesday challenge over at Splitcoast Stampers.  This week's recipient has been dealing with some serious medical issues lately and could use a little happy mail.  She is an artist who paints a lot of trees and landscapes, and she loves tulips and roses.  I had some gorgeous rose paper in my stash, so I knew right away that I would feature this paper on my project.

Here's my card:


I started with a black card stock base.  I cut a panel of patterned paper slightly smaller than the card front (about 1/8" smaller on all sides) and attached it to the base.  I stamped my sentiment on vellum and heat set it with clear embossing powder, then die cut it.  Because it was difficult to see the sentiment against the patterned paper, I also die cut a piece of black card stock in the same size to layer behind it.  I attached the vellum to the card stock with tiny black brads.  I wrapped black fiber around the card base and added my sentiment over the fibers using dimensional foam tape.  Not much stamping on this card, but I love how the paper really steals the show!

We still haven't had much snow or rain where I live (and we desperately need it), but I heard we may be getting a storm in the next couple of days.  I'm hoping for snow, but at this point I'll take whatever moisture we can get!  

I hope you are staying safe and warm, and I hope you'll visit me again.  Thanks for stopping by!

Products Used:
Stamp: Sincere Salutations (Stampin' Up!)
Ink: Craft Black (Stampin' Up!)
Paper: Red Roses (Recollections); black card stock, vellum (unknown)
Tools and Accessories: Nestabilities Labels Eighteen (Spellbinders); black fiber (On the Surface); clear embossing powder (Mrs. O'Leary's); dimensional foam tape (Scotch); tiny black brads (unknown)

Sunday, February 10, 2013

Clean and Simple Fairy Tale Wedding

Happy Sunday!  I rarely post on the weekends, but I'm so excited about the code word this week at CASology that I'm hurrying to post my card before the challenge deadline.


I just love a good fairy tale!  I bought a wonderful set of stamps several years ago that I used for my wedding, and I thought they would be perfect for this challenge.  The CASology challenges call for Clean and Simple (CAS) cards, and I chose to make a *very* CAS card for this one:


Here's a better view of the scored lines:


I started by die cutting a scalloped square from white card stock.  I stamped the church image in Craft Black ink, then sprinkled it with clear embossing powder and heat embossed it.  I chalked over the piece with Mauve Mist chalk.  I stamped the sentiment in Craft Black directly on the card base and heat embossed it with clear embossing powder.  I scored lines on the card and adhered a piece of black shimmery card stock to the card front.  I adhered the scalloped square over the shimmery black piece using Stampin' Dimensionals.  I added Glossy Accents to the church image, then wiped most of it away with my finger, leaving a very light layer of satiny finish.

I'll be posting some Valentine's Day projects this week, so I hope you'll visit me again soon.  Thanks for stopping by!

Products Used:
Stamps: Fairy-Tale Wedding (Stampin' Up!)
Ink: Craft Black Ink (Stampin' Up!)
Paper: Classic Crest Solar White 110 lb. card stock (Neenah); Shimmer Matstack (DCWV)
Tools and Accessories: Bigz Scallop Squares Duo (Stampin' Up!/Sizzix); clear embossing powder (Mrs. O'Leary's); Mauve Mist Stampin' Pastels (Stampin' Up!); Glossy Accents (Ranger); 
Stampin' Dimensionals (Stampin' Up!)

Tuesday, February 5, 2013

Mixed Media Valentine

Happy Tuesday!  After a few days away from crafting while I nursed a migraine (oh, those evil weather changes) and rushed my way through a busy weekend, I finally had a chance to play in a brand-new challenge at Splitcoast Stampers, the Mix-Ability Challenge.  This one is so much fun!  It challenges us to use mixed media in projects, but even better, it teaches us how to use mixed media in projects.  Lydia even created a fantastic video for the challenge, which you can see HERE.

This week's challenge is "Yin Yang".  We're asked to use something matte and something shiny on our cards.  Since Lydia's video showed how to use gesso and I've been wanting to try gesso on a card, I used that medium to create a matte background for my heart.  I have two "shiny" things on my card, one subtle and one not-so-subtle.  I used heat embossing on my heart and I created a "raindrop" background using crinkled paper, Versamark and Glassy Glaze.  

Here's my card:


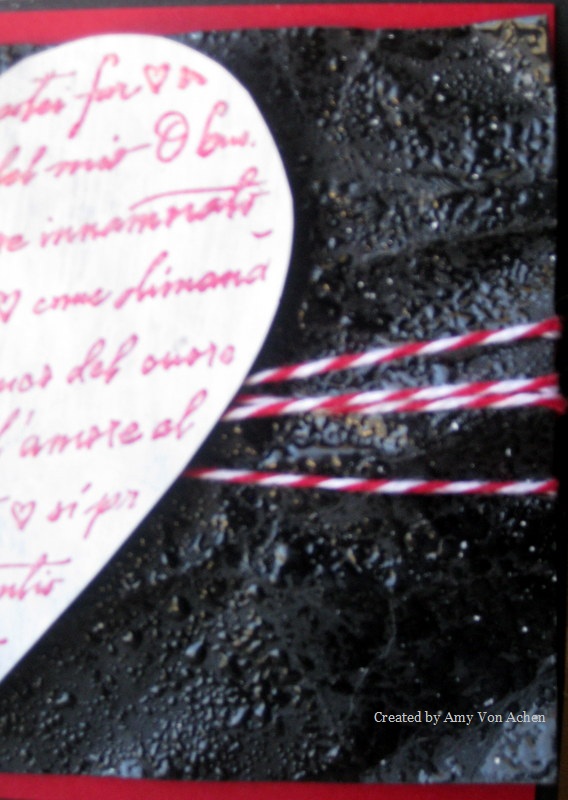
Here's a close-up of the heart:


And hopefully you can see the shiny background a bit better here:


I started by applying gesso to a piece of patterned paper that was black with white hearts.  (I was hoping a bit of the pattern would show through, but I was a bit too heavy-handed with the gesso.)  I used a heat gun to dry the panel because I'm too impatient to watch paint dry!  I stamped my image over the gesso with Rose Red craft ink and heat embossed it with clear embossing powder, then cut around the image to create the heart shape.  Because the patterned paper is very light-weight, I cut a smaller-sized heart from chipboard (so it wouldn't be noticeable) and adhered it to the back of the stamped heart to give it some stability on the card.

Next I got to work on my shiny panel.  I spritzed a piece of black card stock with water, then crumpled it.  Once it was nicely crumpled, I flattened it out a bit and ran my heat gun over it to be sure all the water had dried.  I rubbed Versamark all over it using the direct-to-paper method, then applied Glassy Glaze, which is like a chunky, shiny embossing powder.  I heat set the Glassy Glaze to create a shiny, wet look that reminds me of raindrops. 

I wrapped red and white baker's twine around the black piece.  I adhered the black piece to a panel of red card stock, then adhered the red piece to a black card base that was cut to 4" x 5 1/2" (slightly smaller than an A2 card). I attached the heart to the shiny black panel using thick foam dimensionals and placed Zots on top of the dimensionals to really help the heart stick to the black panel.

I had so much fun playing with new tools for this card!  I have really enjoyed making different styles of valentines over the past couple of weeks, especially since I can use my favorite color combo (black, white and red) so easily at this time of year!  If you want to learn how to use new mediums and explore your creativity a bit, too, I hope you'll give the new Mix-Ability Challenge a try!  

Thanks for stopping by today!

Products Used:
Stamp: Amore HeartPrint (Hero Arts)
Ink: Rose Red Craft Ink (Stampin' Up!). Versamark (Tsukineko)
Paper: B&W Doodle Hearts (The Paper Studio); red and black card stock (unknown)
Tools and Accessories: Gesso (O'Leary Paint); clear embossing powder (Mrs. O'Leary's); Glassy Glaze (Stampin' Up!); baker's twine (Strands, Etc.); 3D Foam Squares and Zots (Therm-O-Web); chipboard


Tuesday, January 29, 2013

Tipsy Hearts Valentine

Happy Tuesday!  It's Teapot Tuesday time at Splitcoast Stampers, and this week's challenge asks us to make a card using a black-and-white combination on a Valentine in the form of spots, dots, patterns, etc.  I love using black and white, but find myself always wanting to sneak in a pop of red!  

Here's my card:


I think I'm on a Clean and Simple (CAS) kick this week!  I really like the uncluttered look of this style.  I started by die cutting my hearts from patterned paper.  The patterned paper is pretty thin, so I also die cut some chipboard and adhered it to the paper.  Using a black marker, I colored the edges so the "kraft" color of the chipboard wouldn't be seen on the card.  I covered the patterned paper with Versamark using the direct-to-paper method, added clear embossing powder and heat embossed it to give the hearts a shiny finish.  I die cut another heart from a piece of heavyweight white card stock, stamped my sentiment, then inked around the heart with the black marker.

I used my Big Shot to emboss a piece of red card stock with a Texturz plate, then wrapped my ribbon around the red panel.  I attached the red panel to the card base and adhered my hearts using foam tape to add dimension.  For extra support, I added a white liner to the inside panel and stamped it with two small hearts.

Here's a closer look at the hearts and textured background:


I'd like to share a couple of money-saving tips that helped with this card:

Sentiment: I needed a sentiment that would fit inside the small heart on this card but had difficulty finding one.  The "for you" sentiment I found is actually part of a larger stamp that has an image beneath the words. To use just the words, I covered the rest of the stamp with a piece of paper and inked up just the words I wanted to use, then removed the paper "mask" and stamped my sentiment.  This is a great way to get extra use out of stamps (and avoid having to buy extra sentiments).  

Chipboad: You can buy chipboard at craft stores, but you can also find a lot of it around your home.  Since I knew I'd be covering up the chipboard with paper, I used a cereal box for my chipboard.  Once you start looking for it, you can find chipboard all over the place!   Another "free" source of chipboard is the piece that's often inserted into your shopping bag (to keep your paper from bending) when you purchase patterned paper at craft stores and hobby stores. 

I'm also entering two other challenges with this card:  'ABC' Challenges asks us to make Valentine's Day cards, and Addicted to CAS gave us the code word "heart".  If you want to play along with these challenges, click on the links to join in the fun!

Thanks for stopping by!
Products Used:
Stamp: Fun Filled (Stampin' Up!)
Paper: Small Black Dots (Recollections); Classic Crest Solar White 110 lb. card stock (Neenah); 
black card stock, red card stock (unknown)
Ink: Memento Tuxedo Black (Tsukineko); Versamark (Tsukineko)
Tools and Accessories: Big Shot (Sizzix); Hearts, Tipsy (Sizzix); Crush On You Texturz Texture Plate (Sizzix); clear embossing powder (Mrs. O'Leary's); ribbon (Celebrate It Basic-Basic 1 1/2 inch)

Monday, January 21, 2013

Cork and Chalkboard Valentine

Happy Monday!  I spent part of the weekend working on the reorganization project in my craft room, but I managed to carve out a little time late last night to put together a card for a couple of challenges at Splitcoast Stampers.  The Ways to Use It challenge asked us to use cork on a card.  I have a big roll of cork but I never think to use it on my cards, so this was a fun challenge.  

The other challenge I tried is a new one to me, the Fan Club Central Theme challenge.  This month's theme is "dirty laundry", and let me tell you, this one hits close to home for me!  The only way to access my craft room is through the laundry room, so I have to walk past Mount St. Laundry whenever I want to make a card!  One of the options was to make a card using color combinations from the clothes in our laundry baskets.  I surveyed my laundry and noticed a lot of black and red, so I decided to use those colors for this card (and white, in honor of the big pile of towels my kids used for their baths!).  

I also have a "dirty little secret" (another challenge option): I used a little piece of plain old Scotch tape to clean up the extra bits of embossing powder that stuck to my black card stock before I heat embossed it.  I've found it pulls away the excess powder much cleaner than the brush I usually use.  I also used Scotch tape to hold the twine in place on the back of my red panel.  That stuff is handy!

Here's my card:


I started by die cutting the cork to make a frame, then set it aside to make my chalkboard (to see more about the chalkboard technique, please see this post).  I stamped my image and sentiment in white craft ink on black card stock, then heat embossed them using white embossing powder.  I sponged white craft ink over the panel and rubbed it with a towel to create the look of eraser marks.  I adhered the black panel to the cork frame, then attached the framed piece to a panel of Real Red card stock.  I wrapped red and white baker's twine around the red panel and secured it with Zots and a decorative white button.  Finally, I attached the red panel to a heavy white card base.  

I'm really excited by this month's Fan Club challenges ("laundry" is normally a dirty word at my house, no pun intended!) and look forward to trying other options in the challenges.

Thanks for stopping by today!

Products Used:

Ink: Craft White (Stampin' Up!)
Stamps: Heart (Stampabilities); Be My Valentine (Hambo Stamps)
Paper: Classic Crest Solar White 110 lb. card stock (Neenah); 
Real Red card stock (Stampin' Up!);  black card stock (unknown)
Tools and Accessories: Stampin' Emboss Powder White (Stampin' Up!); frame die (Sizzix);
Zots (Therm-O-Web); baker's twine (purchased from Strands Etcetera on Etsy); cork; button

Wednesday, December 5, 2012

Holly Jolly Sparkly Snowman

Whew!  It's been several days since my last post but I finally have a new card to share with you. This card was so much fun to create!  I started with an idea in my head that actually worked out on paper, which is always exciting!

For today's card I decided to CASE (Copy and Share Everything) some ideas I saw recently and use them to make an original card.  I saw a project on Splitcoast Stampers that used embossed circles for a snowman's body (see the project HERE)  and I really liked the idea of embossing a snowman.  I also saw a card that used a swirled embossing folder with glitter glue (see it HERE), and I was inspired to add Stickles to my embossing.  This week's Try a New Technique Challenge at Splitcoast Stampers asked us to make our own snowmen, so I used these ideas to create this sparkly, swirly snowman card:

I tried photographing this many times and just couldn't get a picture of the whole card that really shows the sparkle on the snowman as well as the embossing on the blue piece, so here are a couple of close-ups:


I started with a Neenah 110 lb. white card base and added a piece of wintry patterned paper to cover the card front.  I die cut 3 circles from Whisper White card stock, then embossed them with the D'Vine Swirls embossing folder.  I created a hat from black card stock and attached it to the "head" of the snowman.  I stamped my sentiment on Whisper White in Versafine Onyx Black and heat embossed it with clear embossing powder, then attached it to a piece of black card stock.  I cut a strip of blue card stock and embossed it with the Swirls, Ribbons and Snowflakes embossing folder, then cut the end to a point.

Once I had all the elements cut and stamped, I attached them to the card front.  I carefully applied Star Dust Stickles directly from the bottle to the raised embossing on the snowman.  I wanted to add some dimension to the snowflakes on my blue piece, so I added Stickles to the centers.  I quickly decided I didn't like the way that looked, so I added tiny pearls to the centers instead. 

I set the card aside to dry overnight (and somehow managed not to smear my Stickles, which was quite a feat for me!).  I had so much fun with this card that I will probably make a few more using different backgrounds, colors and embossing folders. 

I am also entering this card for the Paper Players #124 Challenge (snowman cards) and the ABC Challenge #7 (holiday cards with bling).  Thanks for stopping by today!


Products Used:
 
Stamp: Merry Merry (Recollections)
Ink: Versafine Onyx Black (Tsukineko)
Paper: Solar White 110 lb. card stock (Neenah); Whisper White card stock (Stampin' Up!); Arctic Wishes Matstock (DCWV); black card stock, blue card stock (unknown)
Tools and Accessories: Circles #2 die (Sizzix); D'Vine Swirls embossing folder (Cuttlebug); Swirls, Ribbons and Snowflakes embossing folder (BasicGrey/Sizzix); Big Shot (Sizzix); clear embossing powder (Mrs. O'Leary's); Star Dust Stickles (Ranger); tiny pearls (Zva Creative)


Wednesday, October 10, 2012

Anniversary Card for My Husband

Recently my husband and I celebrated our fifth wedding anniversary.  He's the kind of guy who thoughtfully remembers the little details that I often forget, so I tried very hard to create a card with details that were reminiscent of our wedding.  Our wedding colors were black and white, and my bridesmaids and I carried red roses to add a splash of color.  I recreated those colors on this card.  The sentiment is from a set I used to stamp the napkins for our wedding.  I tried to keep the embellishments to a minimum, as I didn't want to "girly" this card up too much for my husband!  Here's the card I made for him:


I stamped the background stamp in craft ink on white card stock, then heat embossed it with clear embossing powder.  I attached a piece of red ribbon (repurposed from a package I received recently...I always save those ribbons!) to the embossed panel.  I used my Big Shot and a Sizzix die to cut rectangles of black and white card stock, stamped my sentiment and adhered the stamped piece to a larger black rectangle.  I added black brads to the corners and adhered that piece to the embossed card stock using dimensionals.  I then attached the whole panel to a card base made of black card stock and added a white liner to the inside of the card.

My husband and I have been blessed with beautiful children, a strong support system of family and friends, and a Savior who has carried us through the ups and downs of life.  There's a whole lot of love in our house, and life around here is always exciting.  If that's not worth taking the time to make a special card, I don't know what is!

Thanks for stopping by today!

Products used:
Background Stamp: Soft Swirls (Stampin' Up!)
Sentiment Stamp: Love Matters (Stampin' Up!)
Ink: Basic Black Craft ink (Stampin' Up!), Memento Tuxedo Black
Embossing Powder: Clear (Mrs. O'Leary's)
Embellishments: Black brads, red ribbon


Monday, October 1, 2012

Go Ahead, Copy Me!

You know how in school you're not allowed to copy someone else's work?  Well, in cardmaking circles, copying is form of flattery!  There's even an acronym for it: CASE, which stands for Copy and Share Everything.  This doesn't mean you duplicate the card exactly; instead, you use the existing card to springboard your own creativity.  You can replicate the colors, the sentiment, the design, etc., but put your own twist on them and change up a few elements.

Today's card is a CASE for a Splitcoast Stampers challenge.  Once a week, a Featured Stamper is chosen, and those who play in the challenge pick one of the Featured Stamper's cards to CASE.  The original card can be seen here.  This is my CASE of that card:


I kept the basic layout and design of the original card.  I chose a different sentiment from the same set used on the original card.  I also changed the colors, the image and the number of layers. 

I started by sponging several hues of purple and lavender chalks on a panel of white card stock.  I sponged the chalk by rubbing a piece of craft sponge (you could also use a sponge dauber) in my chalk, then rubbing it on the card stock in a circular motion.  I started with my palest lavender shade and gradually added more color, using progressively darker shades of purple.  I stamped my image in White Craft Ink, then covered the ink in white embossing powder and Stampin' Up! Glassy Glaze embossing powder.  (I added the Glassy Glaze because I don't like the way my white embossing powder sets on its own.  If you have a better-quality white EP, you would not need to add Glassy Glaze).  I heat embossed the image, then stamped "Happy Birthday" in Elegant Eggplant Classic Ink.  I adhered this panel to an Elegant Eggplant card base.  In the picture the card base almost looks black, but in reality it's a very deep and rich purple.  It's one of my favorite card stock colors!

This card offers endless possibilities for colors, images and sentiments.  And if you've never tried sponging chalk, I hope you'll give it a try!  Here's a tip: A white eraser can fix most chalk mistakes, which makes it a great medium for perfectionists! 

Here's a list of the Stampin' Up! products I used:

Stampin' Pastels (chalks)
Glassy Glaze
Elegant Eggplant card stock and dye ink
Sentiment - "Elegant Greetings"
Image - "Close as a Memory"
 
 
Thanks for stopping by!  Happy Stamping!