I'm Amy, a stay-at-home mom by day and a crafter by night. After a day of chasing my kids around the house, I escape to my craft room for a few hours of creating while they sleep. Thanks for joining me in my little corner of the crafting world!
Showing posts with label twine. Show all posts

Wednesday, February 13, 2013

Valentine's Day Treats

Happy Wednesday!  Valentine's Day is almost here, which makes me a little sad because I love Valentine's Day crafting.  My son needed valentines for his classmates this week and I found a fantastic tutorial for adorable treat holders, so I just had to make some fun little packages for his class.  A friend recently lamented that her child's school doesn't allow candy at their Valentine's Day class parties.  Oh, the horrors!  As a dedicated chocoholic, I cannot imagine this holiday without candy.  Thank goodness my son's school isn't so strict!!

Here's what I made:

The kids are asked to give signed but unaddressed valentines.  
I substituted my name for my son's name just for these pictures. 

Here's a side view, so you can see how they stand:


(I have to apologize for the quality of the pictures.  I finished them late at night and sent them to school with my son in the morning, so I had to photograph them without natural light.  Nothing like last-minute crafting!)

These treat holders come together very quickly and Angie's tutorial is really easy to follow.  The tutorial shows how to make a Halloween treat package, but as you can see it can easily be adapted to other holidays.  Here's the tutorial and video I followed, which includes measurements and assembly instructions: Chic' n Scratch. (While you're there, check out some of Angie's other tutorials.  She has over 400 of them!)

If you use an 8.5 x 11 piece of card stock for the base you can make three packages from one piece of card stock.  I also had some 12 x 12 card stock that I wanted to use, so I was able to get more packages from a piece that size.  I made 12 packages for my son's class and only needed one piece of 12 x 12 patterned paper (I only used the patterned paper on the front side of each package).  I filled them with the snack size bags of candy, which cost me less than 20 cents each.  I decorated mine by making a bow from baker's twine and attaching it with a mini glue dot to the tag, then attaching the tag to the package with dimensional foam tape (all things that I had in my stash of supplies).  This is a very cost-effective project!

I chose to staple the candy to the package to keep it in place, but forgot to staple it before adhering the patterned paper.  Quick fix: I adhered the tag over the staple.  Easy peasy!

I hope you're enjoying your Valentine's Day crafting!  Tomorrow I will post one final Valentine's Day card, so I hope you'll visit me again.  Thanks for stopping by!


Products Used:
Stamp: deadbeat DESIGNS
Paper: Red card stock (Bazzill); Classic Crest Solar White 110 lb. card stock (Neenah); 
Candy Pile (EK Success, Ltd.) 
Ink: Real Red Classic Ink (Stampin' Up!); Pure Black Writer (Zig)
Tools and Accessories: Small and Large Tag Punches (Stampin' Up!); baker's twine (Strands Etc.); 
mini glue dots; foam tape


Tuesday, February 5, 2013

Mixed Media Valentine

Happy Tuesday!  After a few days away from crafting while I nursed a migraine (oh, those evil weather changes) and rushed my way through a busy weekend, I finally had a chance to play in a brand-new challenge at Splitcoast Stampers, the Mix-Ability Challenge.  This one is so much fun!  It challenges us to use mixed media in projects, but even better, it teaches us how to use mixed media in projects.  Lydia even created a fantastic video for the challenge, which you can see HERE.

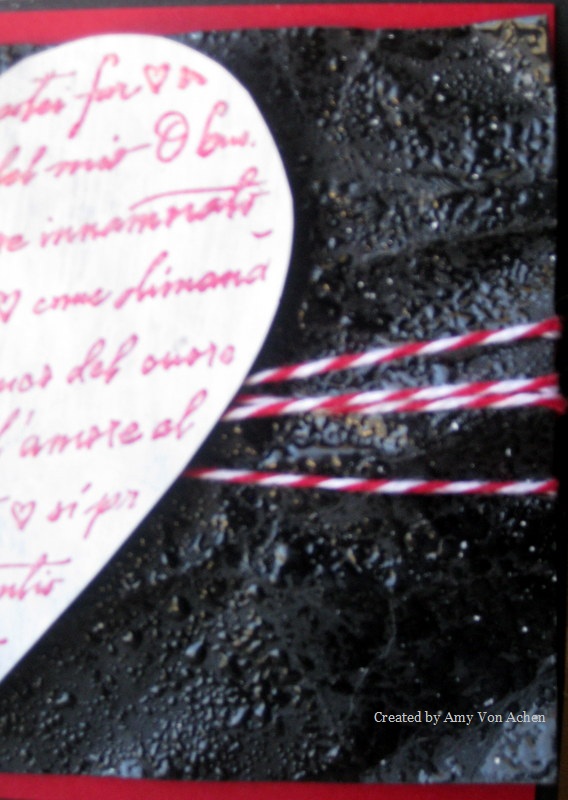
This week's challenge is "Yin Yang".  We're asked to use something matte and something shiny on our cards.  Since Lydia's video showed how to use gesso and I've been wanting to try gesso on a card, I used that medium to create a matte background for my heart.  I have two "shiny" things on my card, one subtle and one not-so-subtle.  I used heat embossing on my heart and I created a "raindrop" background using crinkled paper, Versamark and Glassy Glaze.  

Here's my card:


Here's a close-up of the heart:


And hopefully you can see the shiny background a bit better here:


I started by applying gesso to a piece of patterned paper that was black with white hearts.  (I was hoping a bit of the pattern would show through, but I was a bit too heavy-handed with the gesso.)  I used a heat gun to dry the panel because I'm too impatient to watch paint dry!  I stamped my image over the gesso with Rose Red craft ink and heat embossed it with clear embossing powder, then cut around the image to create the heart shape.  Because the patterned paper is very light-weight, I cut a smaller-sized heart from chipboard (so it wouldn't be noticeable) and adhered it to the back of the stamped heart to give it some stability on the card.

Next I got to work on my shiny panel.  I spritzed a piece of black card stock with water, then crumpled it.  Once it was nicely crumpled, I flattened it out a bit and ran my heat gun over it to be sure all the water had dried.  I rubbed Versamark all over it using the direct-to-paper method, then applied Glassy Glaze, which is like a chunky, shiny embossing powder.  I heat set the Glassy Glaze to create a shiny, wet look that reminds me of raindrops. 

I wrapped red and white baker's twine around the black piece.  I adhered the black piece to a panel of red card stock, then adhered the red piece to a black card base that was cut to 4" x 5 1/2" (slightly smaller than an A2 card). I attached the heart to the shiny black panel using thick foam dimensionals and placed Zots on top of the dimensionals to really help the heart stick to the black panel.

I had so much fun playing with new tools for this card!  I have really enjoyed making different styles of valentines over the past couple of weeks, especially since I can use my favorite color combo (black, white and red) so easily at this time of year!  If you want to learn how to use new mediums and explore your creativity a bit, too, I hope you'll give the new Mix-Ability Challenge a try!  

Thanks for stopping by today!

Products Used:
Stamp: Amore HeartPrint (Hero Arts)
Ink: Rose Red Craft Ink (Stampin' Up!). Versamark (Tsukineko)
Paper: B&W Doodle Hearts (The Paper Studio); red and black card stock (unknown)
Tools and Accessories: Gesso (O'Leary Paint); clear embossing powder (Mrs. O'Leary's); Glassy Glaze (Stampin' Up!); baker's twine (Strands, Etc.); 3D Foam Squares and Zots (Therm-O-Web); chipboard


Wednesday, January 30, 2013

Coffee for Gail (Featured Player Challenge)

Happy Wednesday!  We woke up to light snow and crazy-cold temperatures this morning.  It's hard to believe it was in the mid-70's here a couple of days ago!  I hope you're all staying warm!

This week's Clean and Simple challenge at Splitcoast Stampers is a "Featured Player" challenge.  Our challenge is to choose one of the Featured Stamper's CAS (Clean and Simple)cards to CASE (Copy and Share Everything).  We have to keep the card clean and simple, which is actually quite challenging!

This week's CAS Featured Player is an amazing CAS designer.  I really enjoy her creativity and style.  
I chose to CASE this one: Chillin' With a Cuppa

Here's my CASE of that card:


Yes, it's another coffee card.  I just love coffee cards!  I kept her design and the coffee theme, and also tried to pull in some of the blue she used on her card.  Instead of using patterned paper for my main panel, I used an embossing folder to create texture and then used patterned paper for my scalloped circle and for the piecing on the coffee mug.

For this card, I started with the smallest parts.  I stamped my coffee mug on white card stock and also on patterned paper.  I cut the mug and handle from the patterned paper and pieced them onto the other mug.  I added white Enamel Accents to the foam, scraped it around a little to create texture, then let it dry.  I punched a heart from red card stock and adhered it to the mug.  I fussy-cut the paper pieced mug and attached it to white die cut circle, then attached the white circle to a piece of patterned paper that I'd die cut into a scalloped circle.  I embossed a piece of red card stock to create the background panel, then attached baker's twine to the red panel.  I adhered the panel to a white card base, then attached my scalloped circle over the twine using dimensionals.  Finally, I added some Stickles to the foam on the image to add a bit of sparkle.

Creating a CAS card like this is, for me, a very intense process because I have to be so darned careful!!  I can't just keep adding layers or embellishments to cover up mistakes like I can with other cards. Another stamper mentioned recently that she keeps baby wipes in her craft room so she can wipe her hands constantly to keep from smudging ink onto her projects, and I need to remember to do that, too.  

I hope you're having a great week, and I hope you'll visit again soon.  Thanks for stopping by!


Products Used:
Stamp: My Cuppa Joe (Gina K. Designs)
Ink: Memento Tuxedo Black (Tsukineko); black marker (Tombow)
Paper: Arctic Wishes Matstock (DCWV); Classic Crest Solar White 110 lb. card stock (Neenah); 
red card stock (unknown)
Tools and Accessories: Heart punch (Marvy Uchida); Big Shot (Sizzix); Square Lattice embossing folder (SU/Sizzix); Nestabilities Standard Circles Large (Spellbinders); Nestabilities Classic Scalloped Circles Large (Spellbinders); Enamel Accents (Ranger); Start Dust Stickles (Ranger); 
Stampin' Dimensionals (Stampin' Up!); baker's twine

Monday, January 21, 2013

Cork and Chalkboard Valentine

Happy Monday!  I spent part of the weekend working on the reorganization project in my craft room, but I managed to carve out a little time late last night to put together a card for a couple of challenges at Splitcoast Stampers.  The Ways to Use It challenge asked us to use cork on a card.  I have a big roll of cork but I never think to use it on my cards, so this was a fun challenge.  

The other challenge I tried is a new one to me, the Fan Club Central Theme challenge.  This month's theme is "dirty laundry", and let me tell you, this one hits close to home for me!  The only way to access my craft room is through the laundry room, so I have to walk past Mount St. Laundry whenever I want to make a card!  One of the options was to make a card using color combinations from the clothes in our laundry baskets.  I surveyed my laundry and noticed a lot of black and red, so I decided to use those colors for this card (and white, in honor of the big pile of towels my kids used for their baths!).  

I also have a "dirty little secret" (another challenge option): I used a little piece of plain old Scotch tape to clean up the extra bits of embossing powder that stuck to my black card stock before I heat embossed it.  I've found it pulls away the excess powder much cleaner than the brush I usually use.  I also used Scotch tape to hold the twine in place on the back of my red panel.  That stuff is handy!

Here's my card:


I started by die cutting the cork to make a frame, then set it aside to make my chalkboard (to see more about the chalkboard technique, please see this post).  I stamped my image and sentiment in white craft ink on black card stock, then heat embossed them using white embossing powder.  I sponged white craft ink over the panel and rubbed it with a towel to create the look of eraser marks.  I adhered the black panel to the cork frame, then attached the framed piece to a panel of Real Red card stock.  I wrapped red and white baker's twine around the red panel and secured it with Zots and a decorative white button.  Finally, I attached the red panel to a heavy white card base.  

I'm really excited by this month's Fan Club challenges ("laundry" is normally a dirty word at my house, no pun intended!) and look forward to trying other options in the challenges.

Thanks for stopping by today!

Products Used:

Ink: Craft White (Stampin' Up!)
Stamps: Heart (Stampabilities); Be My Valentine (Hambo Stamps)
Paper: Classic Crest Solar White 110 lb. card stock (Neenah); 
Real Red card stock (Stampin' Up!);  black card stock (unknown)
Tools and Accessories: Stampin' Emboss Powder White (Stampin' Up!); frame die (Sizzix);
Zots (Therm-O-Web); baker's twine (purchased from Strands Etcetera on Etsy); cork; button

Monday, November 19, 2012

Cocoa and Friendship

Happy Thanksgiving week!  Here in the U.S. we're busy getting ready for a holiday.  It's been unseasonably warm where I live, so I'm having trouble believing we're coming up on the end of November so quickly.  Christmas (my very favorite time of the year) is just around the corner!

Today's card is a quick and easy winter card.  I collect coffee and hot chocolate stamps (and snowman stamps...do you see a wintry pattern emerging here?), so hot drinks appear quite often on my cards during this time of year.  One of my favorite ways to embellish a stamped cup of hot chocolate is with puffy white Liquid Applique.  This is such a fun (and easy) way to add a bit of fluffy whipped cream!

Here's my card:


I stamped my mug in Rich Cocoa on some light brownish card stock (it was in my stash and I have no idea what the color name is).  I added the steam in Close to Cocoa.  The steam is from a different set.  I love to mix and match my stamp sets to make them more versatile. 

I stamped my sentiment in Rich Cocoa, then die cut it and inked the edges with Rich Cocoa.  I used a dewdrop-sized pad this time because the smaller size makes it so much easier to ink the edges on a small label.  I added some baker's twine to my panel and then attached my sentiment piece with Stampin' Dimensionals over the twine.  I adhered the panel to a dark brown card base (also from my stash) and applied Liquid Applique.  I allowed it to dry, then used my heat tool to puff it up.  I decided it needed just a bit more so I added more Liquid Applique over it and puffed it up with the heat tool again.  I love that you can add layers and continue building the "foam" if you want to.  I thought it needed a little something else, so I added a red striped straw over the foam.  Unfortunately a bit of the red got on the foam (those new SU ink pads are JUICY!), so once again I added some more Liquid Applique and heat set it.  See how great this stuff is for covering up mistakes and creating dimension?

I am leaving this card as a "friendship" card by not adding any other sentiment, but I could easily change it to a missing you, thank you, love you, thinking of you, etc. card just by adding a sentiment to the inside. 

Thanks for visiting! 

Products Used:
 
Stamps (mug and sentiment): Close to My Heart
Stamps (steam and straw): Like it a Latte (Stampin' Up!)
Ink: Memento Rich Cocoa (Tsukineko); Close to Cocoa, Real Red (Stampin' Up!)
Tools and Accessories: White Liquid Applique (Marvy); Baker's Twine (unknown); Nestabilities Labels One (Spellbinders); Big Shot (Sizzix); Stampin' Dimensionals (Stampin' Up!)

Thursday, November 8, 2012

Thanks a Bunch!

I finally had a chance to spend some time in my craft room and boy, is my craft table a mess!  Looks like I will be doing some reorganizing this weekend.  Doesn't that sound like fun?!

I want to give a shout-out and thanks to my followers.  Some of you have just started following my blog, and I thank each of you for taking the time to follow and visit!

After a busy week without much creative time, I really wanted to get back to challenges.  I combined this week's Ways to Use It challenge at Splitcoast Stampers (make a "thank you" card) with this week's sketch challenge at Operation Write Home.  Here's the sketch:


I love the simplicity of this sketch!  I chose to make a few small additions but tried to stick closely to the measurements provided.  Here's my card:


(I apologize for the shadows on this card, particularly the one around the sentiment panel.  The shadow and the brown card stock really blend together and it's hard to tell where the paper ends and the shadow begins.  I didn't notice it until I had already deleted my other pictures...ugh!)

I really struggle with matching patterned papers, so I was pleased as punch to find this two-sided paper in my stash!  I used the flowery side for the larger panel and used the lighter side for the smaller piece.  I made a card base with Chocolate Chip card stock and added some brown and white baker's twine to tie it all together.  I stamped my sentiment in Rich Cocoa on Crumb Cake, used watercolor crayons and a slightly wet brush to color the image, then layered that piece with Chocolate Chip.  I had planned to simply attach the sentiment panel to the middle of the long strip, but I made an error as I was adhering my layers and tore the flowery paper slightly.  Thankfully there's usually a way to hide errors like this, and it often involves adding more layers or moving elements around.  I moved the sentiment panel to the left side of the card to cover my mistake and adhered it with dimensionals.  I knew I'd need some sort of embellishment on the right side to balance it all out, so I decided to fussy-cut two of the flowers from the leftover patterned paper (I am not a fan of fussy-cutting, so I did not come to this decision easily!).  After cutting out the flowers, I added a small white brad to the middle of each and attached them to the card with mini glue dots.  To add a little dimension, I lightly rolled the ends of the flowers so they would stand off the paper a bit.

This is a simple and quick card that could be used for many occasions just by changing the sentiment.  I am sure I will be using this sketch again!

Thanks for stopping by!
 
Products Used:
 
Stamp: Thanks a Bunch (Unity)
Ink: Memento Rich Cocoa (Tsukineko)
Paper: Chocolate Chip and Crumb Cake card stock (Stampin' Up!); patterned paper (unknown)
Accessories and Tools: Watercolor crayons (Staedtler); white mini brads, brown and white baker's twine


Friday, October 19, 2012

My First Midweek Throwdown Entry!

I completed my very first challenge for Operation Write Home!  I am so excited!!  I have started making cards to donate and decided using challenges will help me accomplish my goal faster.  I chose to do the Midweek Color Throwdown over on their blog, Stars and Stamps.  The challenge this week was to make a card using black and white with a "pop" of either red or green.  I was surprised at how difficult I found this challenge, considering that one of my favorite color combinations is black, white and red.  In fact, I've blogged about a couple of cards using these colors recently (HERE and HERE).  I'm going to blame my creative frustration on the fact that my baby is teething so I'm not sleeping much! 

I decided to make a "general" card, as our deployed servicemen and servicewomen can always use "any occasion" cards.  This stamp is from a set that really frustrates me because the font is intentionally messy. Whenever I use it I find myself trying to correct the ink mistakes, only to realize they are not mistakes, they're part of the design.  Being a bit of a perfectionist, this drives me batty! 

Here's my card:


See how it looks like my stamp skipped a bit or I wiggled it too much?  I promise that's how the stamp is designed!  I stamped the sentiment on white card stock, then die cut it using Nestabilities in my Big Shot.  I cut red and black card stocks with the same Nestabilities set, then layered the pieces.  I embossed the white card stock in my Big Shot, adhered the stamped piece to it, and tied some baker's twine around it.  I adhered the white panel to the black card base.  This is a quick Clean and Simple card, which seems to be my style this month.  This stamp set comes with four different sentiments, so I could easily make several different cards with this CAS layout. 

That's all for today!  We have a busy weekend ahead of us, but I hope to get some stamping time in to finish another project that's waiting on my desk. 

I hope you have a great weekend!  Thanks for stopping by!
 
Products Used:
 
Stamp: That's Nice (Stampin' Up!)
Ink: Memento Tuxedo Black
Paper: Various sources
Tools: Spellbinders Nestabilities Labels One; Divine Swirls Embossing Folder; twine