I'm Amy, a stay-at-home mom by day and a crafter by night. After a day of chasing my kids around the house, I escape to my craft room for a few hours of creating while they sleep. Thanks for joining me in my little corner of the crafting world!

Thursday, February 7, 2013

Monochromatic Thinking of You

Happy Thursday!  It sure feels good to be getting this close to the weekend.  We've been awfully busy at my house lately, and I could really use some down time!

This week's Clean and Simple (CAS) challenge at Splitcoast Stampers is a "limited supplies" challenge.  We are challenged to use only monochromatic colors (and one neutral, if we wish).  I chose to use shades of purple, and I added some tiny rhinestones in place of my neutral.  Since it's a CAS challenge, we are supposed to have lots of open space and use few very layers and embellishments.  

Here's my card:
(There's a tiny smudge on the "T", but it's not really noticeable in person.)

I started by stamping my image in Lovely Lilac on Almost Amethyst card stock.  I covered the image in clear embossing powder and heat set it.  I stamped my sentiment in Elegant Eggplant and attached the stamped panel to an Elegant Eggplant card base.  I added tiny rhinestones to the centers of the flowers for just a hint of bling.  Quick and easy!

I love the simplicity and versatility of a monochromatic CAS card.  Elegant Eggplant is one of my favorite Stampin' Up! colors, and sometimes it's nice to use something other than red and white at this time of year.  I'm in the middle of making Valentine's Day treat packages for my son's class, so it was nice to add a little purple to my crafting time this week!

I hope you're having a fun, crafty week.  Thanks for stopping by!  

Products Used:
Image Stamp: Gina K. Designs
Sentiment Stamp: Sincere Salutations (Stampin' Up!)
Paper: Almost Amethyst, Elegant Eggplant (Stampin' Up!)
Ink: Lovely Lilac Craft Ink, Elegant Eggplant Classic Ink (Stampin' Up!)
Accessories: Clear Embossing Powder (Mrs. O'Leary's); tiny rhinestones (Offray)

Tuesday, February 5, 2013

Mixed Media Valentine

Happy Tuesday!  After a few days away from crafting while I nursed a migraine (oh, those evil weather changes) and rushed my way through a busy weekend, I finally had a chance to play in a brand-new challenge at Splitcoast Stampers, the Mix-Ability Challenge.  This one is so much fun!  It challenges us to use mixed media in projects, but even better, it teaches us how to use mixed media in projects.  Lydia even created a fantastic video for the challenge, which you can see HERE.

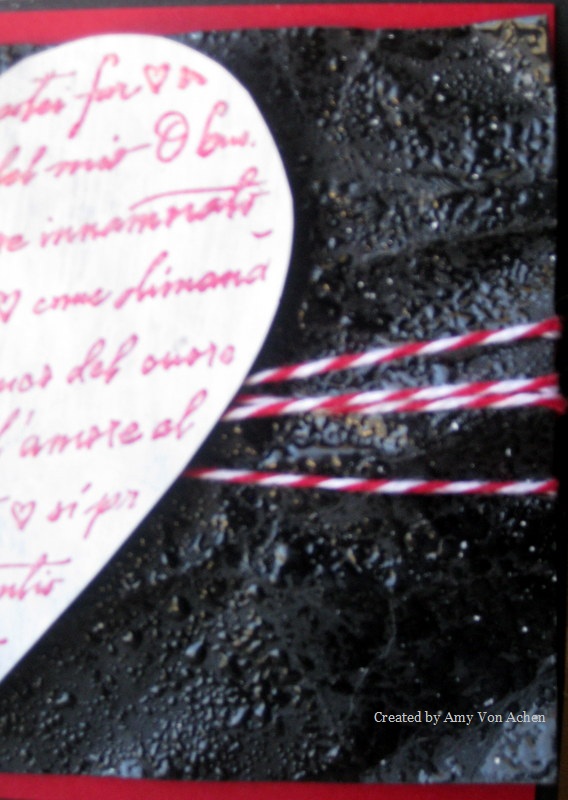
This week's challenge is "Yin Yang".  We're asked to use something matte and something shiny on our cards.  Since Lydia's video showed how to use gesso and I've been wanting to try gesso on a card, I used that medium to create a matte background for my heart.  I have two "shiny" things on my card, one subtle and one not-so-subtle.  I used heat embossing on my heart and I created a "raindrop" background using crinkled paper, Versamark and Glassy Glaze.  

Here's my card:


Here's a close-up of the heart:


And hopefully you can see the shiny background a bit better here:


I started by applying gesso to a piece of patterned paper that was black with white hearts.  (I was hoping a bit of the pattern would show through, but I was a bit too heavy-handed with the gesso.)  I used a heat gun to dry the panel because I'm too impatient to watch paint dry!  I stamped my image over the gesso with Rose Red craft ink and heat embossed it with clear embossing powder, then cut around the image to create the heart shape.  Because the patterned paper is very light-weight, I cut a smaller-sized heart from chipboard (so it wouldn't be noticeable) and adhered it to the back of the stamped heart to give it some stability on the card.

Next I got to work on my shiny panel.  I spritzed a piece of black card stock with water, then crumpled it.  Once it was nicely crumpled, I flattened it out a bit and ran my heat gun over it to be sure all the water had dried.  I rubbed Versamark all over it using the direct-to-paper method, then applied Glassy Glaze, which is like a chunky, shiny embossing powder.  I heat set the Glassy Glaze to create a shiny, wet look that reminds me of raindrops. 

I wrapped red and white baker's twine around the black piece.  I adhered the black piece to a panel of red card stock, then adhered the red piece to a black card base that was cut to 4" x 5 1/2" (slightly smaller than an A2 card). I attached the heart to the shiny black panel using thick foam dimensionals and placed Zots on top of the dimensionals to really help the heart stick to the black panel.

I had so much fun playing with new tools for this card!  I have really enjoyed making different styles of valentines over the past couple of weeks, especially since I can use my favorite color combo (black, white and red) so easily at this time of year!  If you want to learn how to use new mediums and explore your creativity a bit, too, I hope you'll give the new Mix-Ability Challenge a try!  

Thanks for stopping by today!

Products Used:
Stamp: Amore HeartPrint (Hero Arts)
Ink: Rose Red Craft Ink (Stampin' Up!). Versamark (Tsukineko)
Paper: B&W Doodle Hearts (The Paper Studio); red and black card stock (unknown)
Tools and Accessories: Gesso (O'Leary Paint); clear embossing powder (Mrs. O'Leary's); Glassy Glaze (Stampin' Up!); baker's twine (Strands, Etc.); 3D Foam Squares and Zots (Therm-O-Web); chipboard


Wednesday, January 30, 2013

Coffee for Gail (Featured Player Challenge)

Happy Wednesday!  We woke up to light snow and crazy-cold temperatures this morning.  It's hard to believe it was in the mid-70's here a couple of days ago!  I hope you're all staying warm!

This week's Clean and Simple challenge at Splitcoast Stampers is a "Featured Player" challenge.  Our challenge is to choose one of the Featured Stamper's CAS (Clean and Simple)cards to CASE (Copy and Share Everything).  We have to keep the card clean and simple, which is actually quite challenging!

This week's CAS Featured Player is an amazing CAS designer.  I really enjoy her creativity and style.  
I chose to CASE this one: Chillin' With a Cuppa

Here's my CASE of that card:


Yes, it's another coffee card.  I just love coffee cards!  I kept her design and the coffee theme, and also tried to pull in some of the blue she used on her card.  Instead of using patterned paper for my main panel, I used an embossing folder to create texture and then used patterned paper for my scalloped circle and for the piecing on the coffee mug.

For this card, I started with the smallest parts.  I stamped my coffee mug on white card stock and also on patterned paper.  I cut the mug and handle from the patterned paper and pieced them onto the other mug.  I added white Enamel Accents to the foam, scraped it around a little to create texture, then let it dry.  I punched a heart from red card stock and adhered it to the mug.  I fussy-cut the paper pieced mug and attached it to white die cut circle, then attached the white circle to a piece of patterned paper that I'd die cut into a scalloped circle.  I embossed a piece of red card stock to create the background panel, then attached baker's twine to the red panel.  I adhered the panel to a white card base, then attached my scalloped circle over the twine using dimensionals.  Finally, I added some Stickles to the foam on the image to add a bit of sparkle.

Creating a CAS card like this is, for me, a very intense process because I have to be so darned careful!!  I can't just keep adding layers or embellishments to cover up mistakes like I can with other cards. Another stamper mentioned recently that she keeps baby wipes in her craft room so she can wipe her hands constantly to keep from smudging ink onto her projects, and I need to remember to do that, too.  

I hope you're having a great week, and I hope you'll visit again soon.  Thanks for stopping by!


Products Used:
Stamp: My Cuppa Joe (Gina K. Designs)
Ink: Memento Tuxedo Black (Tsukineko); black marker (Tombow)
Paper: Arctic Wishes Matstock (DCWV); Classic Crest Solar White 110 lb. card stock (Neenah); 
red card stock (unknown)
Tools and Accessories: Heart punch (Marvy Uchida); Big Shot (Sizzix); Square Lattice embossing folder (SU/Sizzix); Nestabilities Standard Circles Large (Spellbinders); Nestabilities Classic Scalloped Circles Large (Spellbinders); Enamel Accents (Ranger); Start Dust Stickles (Ranger); 
Stampin' Dimensionals (Stampin' Up!); baker's twine

Tuesday, January 29, 2013

Tipsy Hearts Valentine

Happy Tuesday!  It's Teapot Tuesday time at Splitcoast Stampers, and this week's challenge asks us to make a card using a black-and-white combination on a Valentine in the form of spots, dots, patterns, etc.  I love using black and white, but find myself always wanting to sneak in a pop of red!  

Here's my card:


I think I'm on a Clean and Simple (CAS) kick this week!  I really like the uncluttered look of this style.  I started by die cutting my hearts from patterned paper.  The patterned paper is pretty thin, so I also die cut some chipboard and adhered it to the paper.  Using a black marker, I colored the edges so the "kraft" color of the chipboard wouldn't be seen on the card.  I covered the patterned paper with Versamark using the direct-to-paper method, added clear embossing powder and heat embossed it to give the hearts a shiny finish.  I die cut another heart from a piece of heavyweight white card stock, stamped my sentiment, then inked around the heart with the black marker.

I used my Big Shot to emboss a piece of red card stock with a Texturz plate, then wrapped my ribbon around the red panel.  I attached the red panel to the card base and adhered my hearts using foam tape to add dimension.  For extra support, I added a white liner to the inside panel and stamped it with two small hearts.

Here's a closer look at the hearts and textured background:


I'd like to share a couple of money-saving tips that helped with this card:

Sentiment: I needed a sentiment that would fit inside the small heart on this card but had difficulty finding one.  The "for you" sentiment I found is actually part of a larger stamp that has an image beneath the words. To use just the words, I covered the rest of the stamp with a piece of paper and inked up just the words I wanted to use, then removed the paper "mask" and stamped my sentiment.  This is a great way to get extra use out of stamps (and avoid having to buy extra sentiments).  

Chipboad: You can buy chipboard at craft stores, but you can also find a lot of it around your home.  Since I knew I'd be covering up the chipboard with paper, I used a cereal box for my chipboard.  Once you start looking for it, you can find chipboard all over the place!   Another "free" source of chipboard is the piece that's often inserted into your shopping bag (to keep your paper from bending) when you purchase patterned paper at craft stores and hobby stores. 

I'm also entering two other challenges with this card:  'ABC' Challenges asks us to make Valentine's Day cards, and Addicted to CAS gave us the code word "heart".  If you want to play along with these challenges, click on the links to join in the fun!

Thanks for stopping by!
Products Used:
Stamp: Fun Filled (Stampin' Up!)
Paper: Small Black Dots (Recollections); Classic Crest Solar White 110 lb. card stock (Neenah); 
black card stock, red card stock (unknown)
Ink: Memento Tuxedo Black (Tsukineko); Versamark (Tsukineko)
Tools and Accessories: Big Shot (Sizzix); Hearts, Tipsy (Sizzix); Crush On You Texturz Texture Plate (Sizzix); clear embossing powder (Mrs. O'Leary's); ribbon (Celebrate It Basic-Basic 1 1/2 inch)

Monday, January 28, 2013

A Little CASE, A Little CAS

Happy Monday!  We are having a bit of a "heat wave" where I live, and we're supposed to see temperatures in the mid-70's today.  That is AMAZING for January in the Midwest!  I was almost ready to break out the shorts and t-shirts until then I saw that we'll dip back into the 20's and 30's for lows over the next couple of days.  It may not be time to pack my winter coat just yet!  But today we have lots of sunshine and beautiful weather, so it's not a bad way to start the week at all!

This week's Featured Stamper at Splitcoast Stampers is a crafter whose blog I have been following for awhile now, so I was excited by the challenge to CASE (Copy and Share Everything) one of her darling cards.  She makes the most amazing Clean and Simple (CAS) cards.  With this challenge, we pick a project from her gallery to CASE by changing at least two elements to create a new card.  

Here is a link to the card I chose to CASE: No Shoes

And here is my card: 


I kept the card's design and CAS style.  I changed the image and die cuts, and I used a stamped layer in place of her embossed layer.  

I started by stamping the coffee cup image twice on a piece of Natural White card stock using Rich Cocoa ink.  I fussy cut the entire cup from one image and the center circle only from the second image.  The image doesn't include a band on the card, so I created a band from kraft card stock and pieced it onto the cup.  I adhered the center circle over the band using foam tape to give it some dimension.  I die cut and embossed a layer from dark brown card stock and adhered the coffee cup to it.

I stamped the coffee beans on a piece of Natural White card stock, adhered it to a slightly wider piece of dark brown card stock and attached the panel to a Natural White card base.  I adhered the coffee cup layers, once again using foam tape.  I stamped the sentiment directly on the card base to complete the front of my card.

I'm working on several cards this week and plan to get them posted over the next few days, so I hope you'll visit again soon.  Thanks for stopping by today!

Products Used:
Ink: Memento Rich Cocoa (Tsukineko)
Stamp (cup image): My Cuppa Joe (Gina K. Designs)
Stamp (coffee beans): Espress Yourself (Stampin' Up!) 
Stamp (sentiment): Warm Cup of Coffee (Stampabilities)
Paper: Classic Crest Natural White 80 lb. (Neenah); brown and kraft card stock (unknown)
Tools and Accessories: Nestabilities Labels Eighteen (Spellbinders); Big Shot (Sizzix)


Thursday, January 24, 2013

Valentine for a Friend

Happy Thursday!  It's another dark and dreary (and oh, sooooo cold) day here, but I'm so excited that the weekend is in sight!

I created today's card for a couple of different challenges.  I used the sketch from this week's Card Sketch challenge at Splitcoast Stampers.  I am also entering the color challenge at Dynamic Duos:


The "dessert" option on the color challenge is to make a Valentine, but since I am sending this card to a friend I didn't want to use the traditional hearts and lovey-dovey sentiments.  I left the hearts and flowers behind and headed straight for the chocolate!

This card turned out very differently than I'd planned.  I ended up adding more and more and more layers until the card was so heavy I had to add a heavyweight card stock liner to balance it!  Have you ever heard the children's song, "This is the Song That Never Ends"?  As I created this card, I kept thinking, "This is the card that never ends!"  But I just kept adding layer after layer after layer.  I'll be honest, the creative process got a bit out of control last night!  

Here's my card:


(Isn't that candy image fun?  I went to my mailbox one day, expecting only bills, and was surprised to find a package with this stamp and two other chocolate-themed stamps.  A very sweet family member saw them and thought of me, so she bought them and sent them in the mail as a surprise.  Isn't that the best kind of surprise?  So very "sweet" in more ways than one!)

This is a square card, 5"x5", which I don't often make.  They require square envelopes and additional postage, so I usually reserve this size for cards I'm hand-delivering.  I started by stamping my candy images on Whisper White card stock using Real Red ink, then die cut them.  I used a deckled square punch to cut four squares from Real Red card stock.  I stamped the sentiment in black craft ink, added clear embossing powder and heat embossed it.  Then I started cutting layers (and layers, and layers!) of Real Red, Whisper White and Basic Black card stock and adhered them to the base.  I attached the images and sentiment (using dimensionals behind the sentiment), then covered the candy images with Glossy Accents to get the shiny look of the "real thing".  I added my heavyweight (balancing) inner liner and stamped it with the same candy images in the corners.  Then I searched my house high and low for some of that delicious chocolate candy, and doggone it, there was none to be found!  

I love hearts and flowers and all the romantic stuff of Valentine's Day, but I have come to realize the value of my friendships with women.  This year as I'm celebrating Valentine's Day with my husband and children, I will also be thinking of all those wonderful women who've helped me get to this place of contentment in my life. Good friends are such wonderful blessings!

Thanks so much for stopping by today!  


Products Used:
Paper: Real Red, Basic Black, Whisper White card stock (Stampin' Up!); 
Neenah Classic Crest Solar White 110 lb. card stock (for inner liner, not pictured)
Ink: Real Red Classic Ink, Basic Black Craft Ink (Stampin' Up!)
Stamps: Deadbeat Designs (candy image); Hambo Stamps (sentiment)
Tools and Accessories: Nestabilities Standard Circles Large (Spellbinders); 1 1/4" deckle punch (McGill); 
clear embossing powder (Mrs. O'Leary's); Glossy Accents (Ranger); Stampin' Dimensionals (Stampin' Up!)


Tuesday, January 22, 2013

Vintage Valentine

Happy Tuesday!  It's bright and sunny but very cold here today.  We were blessed with beautiful weather on Saturday (no jackets! short sleeves!) but today we're back to bundling up in coats and hats.  

Over the weekend I stopped in at my local scrapbooking and stamping store.  Sometimes I drop in just to get inspiration, sometimes to pick up something I need and sometimes just to relax and enjoy a little kid-free quiet time.  The owner is very knowledgeable and friendly, and this weekend she pointed me toward some of the cutest 12x12, two-sided Valentine-style paper I've ever seen!  As soon as I saw it, I knew I would be making vintage Valentine's Day cards with it.  Vintage usually isn't my style, but this paper just begs to be distressed!

This week's Clean and Simple (CAS) challenge at Splitcoast Stampers is a sketch challenge (view the challenge sketch HERE to play along).   I chose to flip the sketch on its side and use one of the images from this delightful patterned paper in place of stamping  The challenge with CAS is to use very minimal stamping, images and embellishments while still making a beautiful card, and I've found vintage CAS to be even harder.  I had to restrain myself to keep from adding elements to this card!


(I apologize for the poor picture quality.  I use natural light so I really need to photograph at just the right time of day to get a good picture, but I was running behind and missed the best light.)

I started by cutting the image and distressing it. Next I cut a mat from the reverse side of the paper, distressed it and adhered the image to the mat.  I die cut a border from natural white card stock and distressed that, too.  I attached the border to the larger panel and added three brads, then attached the entire piece to a dark brown card stock base, which was cut slightly smaller than A2 size for a better fit.  

There are several other Valentine images on the 12x12 patterned paper and I can't wait to make cards using the other images.  I liked this paper so much that I hurried back to the store to buy a few more sheets before it's sold out!

Thanks for stopping by today.  I hope you stay warm and cozy!


Products Used:
Paper: Collection: Lovely "Greetings" Two-Sided Paper (Authentique); 
Classic Crest Natural White 80 lb. card stock (Neenah); dark brown card stock (unknown)
Ink: Walnut Stain Distress Ink (Tim Holtz/Ranger) 
Tools and Accessories: Borderabilities Jumbo Scalloped Petite Borders (Spellbinders); brads (Recollections)